How to Blink an LED - Part 6 Microcontroller Basics (PIC10F200)
Published
Note: Microchip recently made some changes and their newer IDE versions use the XC8 compiler for Assembly, whereas all sample code here is created for the MPASM compiler. However, the sample code has been ported to XC8 by user tinyelect on our Discord channel (to whom we are extremely grateful!) and the XC8 version of the code is at the bottom of this tutorial for your reference. To see the changes needed to switch from MPASM to XC8, please check out the process that he shared.
Welcome back! I hope your first experience with the Assembly language was pleasant, that it got you excited, and now you are looking forward to more and more interesting programs. The only way to learn is to continuously make things a little bit harder, so let’s make that LED we lit up last time actually blink.
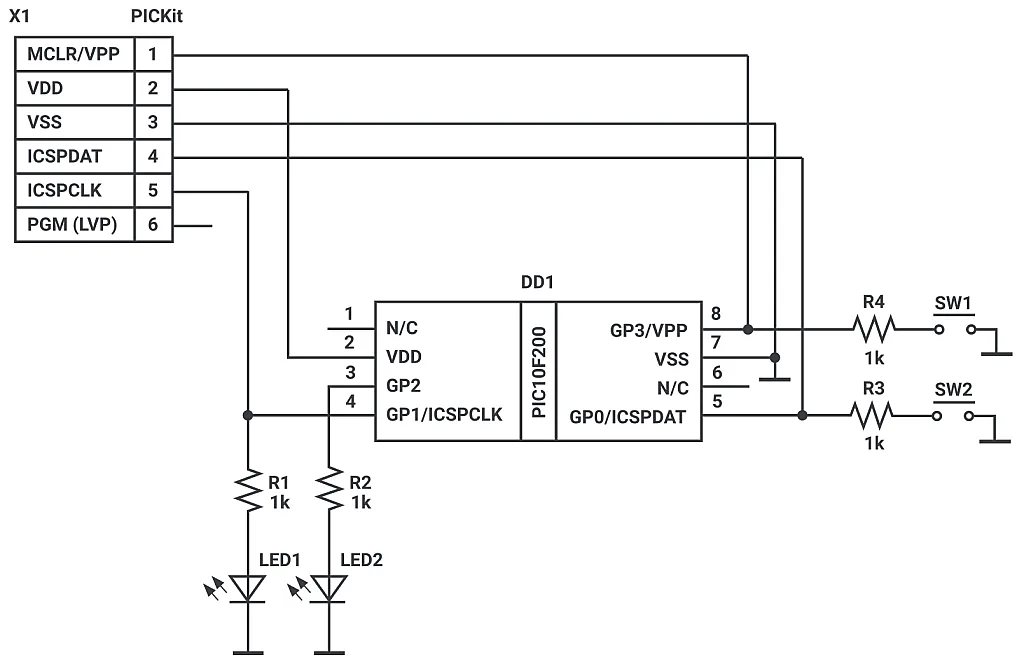
Our goal for this tutorial is to blink LED2 with a frequency of approximately 4 Hz.
First, a quick clarification. This time we will use LED2 unlike LED1 in the last tutorial. Why? Because there are some oddities when using GP2, to which LED2 is connected. And, to be pedantic, the 4 Hz frequency means that the LED should turn on and turn off four times per second, eight state changes in total.
With that out of the way, let’s review the code that can blink the LED:
#include "p10f200.inc"
; CONFIG
   __CONFIG _WDT_OFF & _CP_OFF & _MCLRE_OFF
   ORG 0x0000
INIT
   MOVLW  ~(1<<T0CS)      ;Enable GPIO2
   OPTION
   MOVLW ~(1 << GP2)           ;Set and GP2 as an output
   TRIS GPIO
LOOP
   BSF GPIO, GP2                      ;Set GP2
   CALL DELAY              ;Call DELAY subroutine
   BCF GPIO, GP2          ;Reset GP2
   CALL DELAY              ;Call DELAY subroutine
   GOTO LOOP                   ;loop forever

DELAY             ;Start DELAY subroutine here
    MOVLW D'162'                   ;Load initial value for the delay
    MOVWF 10           ;Copy the value to the register 0x10
    MOVWF 11           ;Copy the value to the register 0x11
DELAY_LOOP         ;Start delay loop
    DECFSZ 10, F                   ;Decrement the register 0x10 and check if not zero
    GOTO DELAY_LOOP        ;If not then go to the DELAY_LOOP label
    DECFSZ 11, F                   ;Else decrement the register 0x11, check if it is not 0
    GOTO DELAY_LOOP        ;If not then go to the DELAY_LOOP label
    RETLW 0                ;Else return from the subroutine


    END
Assembly Code Walkthrough
As I mentioned in the previous tutorial, lines 1 to 5 are the same as in the first program, so we will move to line 6 immediately.
#include "p10f200.inc"
; CONFIG
   __CONFIG _WDT_OFF & _CP_OFF & _MCLRE_OFF
   ORG 0x0000
INIT
   MOVLW  ~(1<<T0CS)      ;Enable GPIO2
In line 6 we can see the known instruction MOVLW which, as you remember, loads a literal to the W register.
Literal is a formal way to refer to any byte of information (value from 0 to 255) represented in any convenient form.
For the literal, we have the ~(1<<T0CS) expression. This expression is also familiar from the previous tutorial but here we’re using T0CS instead of GP1. T0CS bit is responsible for the GP2 pin operation - if it is set to 1, this works as an input to the 8-bit timer counter and thus can’t be used as a general-purpose input/output (GPIO). To release the GP2 pin and allow its operation as a GPIO, we need to clear the T0CS bit of the OPTION register to 0.
Setting a bit means making it a "1" or "high" and clearing a bit means making it a "0" or "low".
With the ~(1<<T0CS) expression, we load 0 into the T0CS bit only, leaving all other bits as 1.
#include "p10f200.inc"
; CONFIG
   __CONFIG _WDT_OFF & _CP_OFF & _MCLRE_OFF
   ORG 0x0000
INIT
   MOVLW  ~(1<<T0CS)      ;Enable GPIO2
   OPTION
Line 7 contains the OPTION instruction. It is like the TRIS instruction, its only application is to copy the content of the W register into the OPTION register, and nothing else. Unlike the TRIS instruction, it doesn’t have any operands. After implementation of lines 6 and 7, the GP2 pin will operate as a GPIO.
As an aside, I want to share an annoyance about this feature of the PIC microcontrollers. I don’t know why the developers did this, but by default all pins which can have alternative functions, such as counter inputs, are configured to implement these functions. So, if I want to just use the LED display or the buttons, I have to find in the data sheet to see what pins are used by which module and disable all these modules. Fortunately, the PIC10F200 is so primitive that only GP2 has an alternate function by default, while all other pins are GPIO by default. On large microcontrollers, this can be a pain. Moving on...
#include "p10f200.inc"
; CONFIG
   __CONFIG _WDT_OFF & _CP_OFF & _MCLRE_OFF
   ORG 0x0000
INIT
   MOVLW  ~(1<<T0CS)      ;Enable GPIO2
   OPTION
   MOVLW ~(1 << GP2)           ;Set and GP2 as an output
   TRIS GPIO
Lines 8 and 9 are similar to the lines 6 and 7 from the previous tutorial except that here we are setting GP2 as an output, not GP1.
#include "p10f200.inc"
; CONFIG
   __CONFIG _WDT_OFF & _CP_OFF & _MCLRE_OFF
   ORG 0x0000
INIT
   MOVLW  ~(1<<T0CS)      ;Enable GPIO2
   OPTION
   MOVLW ~(1 << GP2)           ;Set and GP2 as an output
   TRIS GPIO
LOOP
Line 10 contains a LOOP label (the same as line 9 in the previous tutorial).
#include "p10f200.inc"
; CONFIG
   __CONFIG _WDT_OFF & _CP_OFF & _MCLRE_OFF
   ORG 0x0000
INIT
   MOVLW  ~(1<<T0CS)      ;Enable GPIO2
   OPTION
   MOVLW ~(1 << GP2)           ;Set and GP2 as an output
   TRIS GPIO
LOOP
   BSF GPIO, GP2                      ;Set GP2
Line 11 sets GP2 high with the instruction BSF (similar to line 8 of the previous program). The core difference is that in the current program this instruction is implemented inside the main loop of the program as here we need to change the LED state periodically.
BSF stands for Bit Set F, which means it sets the addressed bit as a "1".
#include "p10f200.inc"
; CONFIG
   __CONFIG _WDT_OFF & _CP_OFF & _MCLRE_OFF
   ORG 0x0000
INIT
   MOVLW  ~(1<<T0CS)      ;Enable GPIO2
   OPTION
   MOVLW ~(1 << GP2)           ;Set and GP2 as an output
   TRIS GPIO
LOOP
   BSF GPIO, GP2                      ;Set GP2
   CALL DELAY              ;Call DELAY subroutine
Line 12 contains a new instruction - CALL. This instruction also belongs to the branch instructions and allows to call the subroutine under the label used as the operand of this instruction. By running CALL DELAY, the program will save the current PC state in the stack and load the PC with the address under the DELAY label (line 17).
PC still stands for program counter, it has nothing to do with personal computers.
You might say, this is what the GOTO instruction does, so why do we need something new? If you are attentive, you might notice one small difference which changes everything. The invocation of the CALL instruction saves the current PC state to the stack, and after finishing the subroutine implementation the PC will be restored from the stack by a special instruction we will consider later. This allows you to keep executing the program from the line that follows the CALL instruction. If you use the GOTO instruction, the PC is not saved in the stack, so you can’t return to the address from which you called GOTO instruction automatically, you need to come up with a manual solution. But why reinvent the wheel? We already have the CALL instruction for this case.
So in line 12 we call the DELAY subroutine which performs a 125ms delay and causes the LED state to change 8 times per second. We will consider how this delay works later.
#include "p10f200.inc"
; CONFIG
   __CONFIG _WDT_OFF & _CP_OFF & _MCLRE_OFF
   ORG 0x0000
INIT
   MOVLW  ~(1<<T0CS)      ;Enable GPIO2
   OPTION
   MOVLW ~(1 << GP2)           ;Set and GP2 as an output
   TRIS GPIO
LOOP
   BSF GPIO, GP2                      ;Set GP2
   CALL DELAY              ;Call DELAY subroutine
   BCF GPIO, GP2          ;Reset GP2
Line 13 has the instruction BCF. It is similar to yet and opposite to BSF. Similar with its syntax and opposite by operation. It clears the bit mentioned as operand 2, in the file register mentioned in operand 1. So by executing the command BCF GPIO, GP2, the microcontroller clears bit GP2 in the GPIO register and thus sets pin GP2 to 0 volts, which turns off LED2.
#include "p10f200.inc"
; CONFIG
   __CONFIG _WDT_OFF & _CP_OFF & _MCLRE_OFF
   ORG 0x0000
INIT
   MOVLW  ~(1<<T0CS)      ;Enable GPIO2
   OPTION
   MOVLW ~(1 << GP2)           ;Set and GP2 as an output
   TRIS GPIO
LOOP
   BSF GPIO, GP2                      ;Set GP2
   CALL DELAY              ;Call DELAY subroutine
   BCF GPIO, GP2          ;Reset GP2
   CALL DELAY              ;Call DELAY subroutine
In line 14 we call the DELAY subroutine again to allow the LED to stay in the off state for 125ms as well.
#include "p10f200.inc"
; CONFIG
   __CONFIG _WDT_OFF & _CP_OFF & _MCLRE_OFF
   ORG 0x0000
INIT
   MOVLW  ~(1<<T0CS)      ;Enable GPIO2
   OPTION
   MOVLW ~(1 << GP2)           ;Set and GP2 as an output
   TRIS GPIO
LOOP
   BSF GPIO, GP2                      ;Set GP2
   CALL DELAY              ;Call DELAY subroutine
   BCF GPIO, GP2          ;Reset GP2
   CALL DELAY              ;Call DELAY subroutine
   GOTO LOOP                   ;loop forever
Line 15 contains the well-known GOTO instruction with the operand LOOP, which means that after line 15, the PC will be loaded with the address under the LOOP label and execute the instruction from there. As you see, this is the instruction BSF on line 11.
So, by executing lines 10 to 15, the LED will be turned on for 125 milliseconds, then turned off for 125 milliseconds, and so on and so forth until we turn off the power.
#include "p10f200.inc"
; CONFIG
   __CONFIG _WDT_OFF & _CP_OFF & _MCLRE_OFF
   ORG 0x0000
INIT
   MOVLW  ~(1<<T0CS)      ;Enable GPIO2
   OPTION
   MOVLW ~(1 << GP2)           ;Set and GP2 as an output
   TRIS GPIO
LOOP
   BSF GPIO, GP2                      ;Set GP2
   CALL DELAY              ;Call DELAY subroutine
   BCF GPIO, GP2          ;Reset GP2
   CALL DELAY              ;Call DELAY subroutine
   GOTO LOOP                   ;loop forever

DELAY             ;Start DELAY subroutine here
Line 16 is blank, it’s just used to separate program parts. You can write a comment here about the following delay subroutine if you want. Or leave it blank. Up to you.
Line 17 contains the DELAY label which tells us that the delay subroutine starts here. First, a short explanation about how it works.
This delay is implemented by making the microprocessor do a tedious and meaningless task to waste time. In our case, it will decrement some given number to 0. The higher the given number, the bigger the delay. Let’s now consider this in more detail as we follow along in the code.
#include "p10f200.inc"
; CONFIG
   __CONFIG _WDT_OFF & _CP_OFF & _MCLRE_OFF
   ORG 0x0000
INIT
   MOVLW  ~(1<<T0CS)      ;Enable GPIO2
   OPTION
   MOVLW ~(1 << GP2)           ;Set and GP2 as an output
   TRIS GPIO
LOOP
   BSF GPIO, GP2                      ;Set GP2
   CALL DELAY              ;Call DELAY subroutine
   BCF GPIO, GP2          ;Reset GP2
   CALL DELAY              ;Call DELAY subroutine
   GOTO LOOP                   ;loop forever

DELAY             ;Start DELAY subroutine here
    MOVLW D'162'                   ;Load initial value for the delay
Line 18 has the now-familiar instruction of MOVLW, which loads the decimal value 162 into the W register.
To use a decimal value instead of hexadecimal, put a D in front of the number.
Here 162 is the above-mentioned “given number” - we will be decrementing from 162 down to 0. How did I calculate it? I’ll tell you the secret later, for now, just believe me.
#include "p10f200.inc"
; CONFIG
   __CONFIG _WDT_OFF & _CP_OFF & _MCLRE_OFF
   ORG 0x0000
INIT
   MOVLW  ~(1<<T0CS)      ;Enable GPIO2
   OPTION
   MOVLW ~(1 << GP2)           ;Set and GP2 as an output
   TRIS GPIO
LOOP
   BSF GPIO, GP2                      ;Set GP2
   CALL DELAY              ;Call DELAY subroutine
   BCF GPIO, GP2          ;Reset GP2
   CALL DELAY              ;Call DELAY subroutine
   GOTO LOOP                   ;loop forever

DELAY             ;Start DELAY subroutine here
    MOVLW D'162'                   ;Load initial value for the delay
    MOVWF 10           ;Copy the value to the register 0x10
    MOVWF 11           ;Copy the value to the register 0x11
Lines 19 and 20 contain the Assembly instruction MOVWF. This instruction copies the value of the W register into the file register whose address is given as the operand of the instruction. So in line 19, the contents of the W register is copied to the file register with the address 0x10, and in line 20 the same value is copied to the address 0x11.
Here I’ll remind you of two things. First, the numbers in the Assembly language are hexadecimal by default, thus 10 and 11 are hexadecimal too, so 10h and 11h, not decimal. They’re the same as 16d and 17d, their decimal equivalents. Second, these addresses belong to the General Purpose registers (see figure 2 of tutorial 3) which means we can use them however we want.
#include "p10f200.inc"
; CONFIG
   __CONFIG _WDT_OFF & _CP_OFF & _MCLRE_OFF
   ORG 0x0000
INIT
   MOVLW  ~(1<<T0CS)      ;Enable GPIO2
   OPTION
   MOVLW ~(1 << GP2)           ;Set and GP2 as an output
   TRIS GPIO
LOOP
   BSF GPIO, GP2                      ;Set GP2
   CALL DELAY              ;Call DELAY subroutine
   BCF GPIO, GP2          ;Reset GP2
   CALL DELAY              ;Call DELAY subroutine
   GOTO LOOP                   ;loop forever

DELAY             ;Start DELAY subroutine here
    MOVLW D'162'                   ;Load initial value for the delay
    MOVWF 10           ;Copy the value to the register 0x10
    MOVWF 11           ;Copy the value to the register 0x11
DELAY_LOOP         ;Start delay loop
In line 21 there is another label DELAY_LOOP which speaks for itself. Here, we start the decrement loop until registers 0x10 and 0x11 become zeros.
#include "p10f200.inc"
; CONFIG
   __CONFIG _WDT_OFF & _CP_OFF & _MCLRE_OFF
   ORG 0x0000
INIT
   MOVLW  ~(1<<T0CS)      ;Enable GPIO2
   OPTION
   MOVLW ~(1 << GP2)           ;Set and GP2 as an output
   TRIS GPIO
LOOP
   BSF GPIO, GP2                      ;Set GP2
   CALL DELAY              ;Call DELAY subroutine
   BCF GPIO, GP2          ;Reset GP2
   CALL DELAY              ;Call DELAY subroutine
   GOTO LOOP                   ;loop forever

DELAY             ;Start DELAY subroutine here
    MOVLW D'162'                   ;Load initial value for the delay
    MOVWF 10           ;Copy the value to the register 0x10
    MOVWF 11           ;Copy the value to the register 0x11
DELAY_LOOP         ;Start delay loop
    DECFSZ 10, F                   ;Decrement the register 0x10 and check if not zero
In line 22 there is new Assembly instruction DECFSZ.
You might say - what’s with those random letters? Actually no, this mnemonic means DECrement File register, Skip if Zero. Like all instructions, the mnemonic has a meaning, and if you remember them it is easier to remember the instructions themselves. E.g. MOVLW means MOVe Literal to W, MOVWF - MOVe W to File register, BSF/BCF - Bit Set/Clear in the File register.
So according to the description, the DECFSZ register decrements the file register given as the first operand, and skips the next line if the register value is zero. Thus, DECFSZ is the first conditional branch operator we’re learning in Assembly. If you are attentive, you might notice that it has a second operand, which we wrote as F. This form is used in a lot of Assembly instructions. If the second operand is F, then the result of the decrement is stored back to the file register, and if the second operator is W then the result is stored to the W register. As we want to decrement the register 0x10, we store the result back to it.
#include "p10f200.inc"
; CONFIG
   __CONFIG _WDT_OFF & _CP_OFF & _MCLRE_OFF
   ORG 0x0000
INIT
   MOVLW  ~(1<<T0CS)      ;Enable GPIO2
   OPTION
   MOVLW ~(1 << GP2)           ;Set and GP2 as an output
   TRIS GPIO
LOOP
   BSF GPIO, GP2                      ;Set GP2
   CALL DELAY              ;Call DELAY subroutine
   BCF GPIO, GP2          ;Reset GP2
   CALL DELAY              ;Call DELAY subroutine
   GOTO LOOP                   ;loop forever

DELAY             ;Start DELAY subroutine here
    MOVLW D'162'                   ;Load initial value for the delay
    MOVWF 10           ;Copy the value to the register 0x10
    MOVWF 11           ;Copy the value to the register 0x11
DELAY_LOOP         ;Start delay loop
    DECFSZ 10, F                   ;Decrement the register 0x10 and check if not zero
    GOTO DELAY_LOOP        ;If not then go to the DELAY_LOOP label
In line 23, there is GOTO DELAY_LOOP which we already should be familiar with. This is an unconditional branch to the line under the label DELAY_LOOP.
Let’s now consider how lines 22 and 23 work together. The initial value of the register 0x10 is 162. After the first decrement it becomes 161 which, obviously, is not zero, thus the next line number 23 is not skipped, and we return to the DELAY_LOOP label, basically to line 22 again and keep decrementing register 0x10. When this register becomes 1, the DECFSZ instruction decrements it and the result becomes zero. This is the signal that the next line should be skipped. So we don’t invoke GOTO in line 23 but jump to line 24 and implement the instruction in this line instead.
#include "p10f200.inc"
; CONFIG
   __CONFIG _WDT_OFF & _CP_OFF & _MCLRE_OFF
   ORG 0x0000
INIT
   MOVLW  ~(1<<T0CS)      ;Enable GPIO2
   OPTION
   MOVLW ~(1 << GP2)           ;Set and GP2 as an output
   TRIS GPIO
LOOP
   BSF GPIO, GP2                      ;Set GP2
   CALL DELAY              ;Call DELAY subroutine
   BCF GPIO, GP2          ;Reset GP2
   CALL DELAY              ;Call DELAY subroutine
   GOTO LOOP                   ;loop forever

DELAY             ;Start DELAY subroutine here
    MOVLW D'162'                   ;Load initial value for the delay
    MOVWF 10           ;Copy the value to the register 0x10
    MOVWF 11           ;Copy the value to the register 0x11
DELAY_LOOP         ;Start delay loop
    DECFSZ 10, F                   ;Decrement the register 0x10 and check if not zero
    GOTO DELAY_LOOP        ;If not then go to the DELAY_LOOP label
    DECFSZ 11, F                   ;Else decrement the register 0x11, check if it is not 0
    GOTO DELAY_LOOP        ;If not then go to the DELAY_LOOP label
Lines 24 and 25 are the same as lines 22 and 23 with the only difference that here the microcontroller decrements register 0x11. So initially the value of the register 0x11 is 162 as well, and after the decrement, its value is not zero and the GOTO instruction in line 25 moves the PC to the DELAY_LOOP label, and there again, it decrements register 0x10. As you remember on the last iteration it has a zero. But after decrementing from 0, it becomes 255, which is not 0, and we start to move between lines 22 and 25 again until the register 0x10 becomes zero again.
If this doesn't make sense to you, remember that 2^8 is 256, so an 8-bit processor like the PIC10F200 counts from 0-255, in a big loop. If you go above 255, you get zero. You go smaller than zero, you get 255.
You might ask - when will this insanity stop? When the value of register 0x11 becomes zero the GOTO instruction in line 25 is skipped and line 26 is (finally) implemented.
#include "p10f200.inc"
; CONFIG
   __CONFIG _WDT_OFF & _CP_OFF & _MCLRE_OFF
   ORG 0x0000
INIT
   MOVLW  ~(1<<T0CS)      ;Enable GPIO2
   OPTION
   MOVLW ~(1 << GP2)           ;Set and GP2 as an output
   TRIS GPIO
LOOP
   BSF GPIO, GP2                      ;Set GP2
   CALL DELAY              ;Call DELAY subroutine
   BCF GPIO, GP2          ;Reset GP2
   CALL DELAY              ;Call DELAY subroutine
   GOTO LOOP                   ;loop forever

DELAY             ;Start DELAY subroutine here
    MOVLW D'162'                   ;Load initial value for the delay
    MOVWF 10           ;Copy the value to the register 0x10
    MOVWF 11           ;Copy the value to the register 0x11
DELAY_LOOP         ;Start delay loop
    DECFSZ 10, F                   ;Decrement the register 0x10 and check if not zero
    GOTO DELAY_LOOP        ;If not then go to the DELAY_LOOP label
    DECFSZ 11, F                   ;Else decrement the register 0x11, check if it is not 0
    GOTO DELAY_LOOP        ;If not then go to the DELAY_LOOP label
    RETLW 0                ;Else return from the subroutine
Line 26 has instruction RETLW (RETurn with Literal in W register). This instruction performs a return from the subroutine and also loads the given literal into the W register. Sometimes loading a value into the W register can be useful but for now we can load any value, e.g. zero. After this instruction, the PC value is restored from the stack and the execution of the program starts from the line directly after the subroutine call.
#include "p10f200.inc"
; CONFIG
   __CONFIG _WDT_OFF & _CP_OFF & _MCLRE_OFF
   ORG 0x0000
INIT
   MOVLW  ~(1<<T0CS)      ;Enable GPIO2
   OPTION
   MOVLW ~(1 << GP2)           ;Set and GP2 as an output
   TRIS GPIO
LOOP
   BSF GPIO, GP2                      ;Set GP2
   CALL DELAY              ;Call DELAY subroutine
   BCF GPIO, GP2          ;Reset GP2
   CALL DELAY              ;Call DELAY subroutine
   GOTO LOOP                   ;loop forever

DELAY             ;Start DELAY subroutine here
    MOVLW D'162'                   ;Load initial value for the delay
    MOVWF 10           ;Copy the value to the register 0x10
    MOVWF 11           ;Copy the value to the register 0x11
DELAY_LOOP         ;Start delay loop
    DECFSZ 10, F                   ;Decrement the register 0x10 and check if not zero
    GOTO DELAY_LOOP        ;If not then go to the DELAY_LOOP label
    DECFSZ 11, F                   ;Else decrement the register 0x11, check if it is not 0
    GOTO DELAY_LOOP        ;If not then go to the DELAY_LOOP label
    RETLW 0                ;Else return from the subroutine


    END
Line 27 is blank. Just checking to see if you’re still paying attention.
Line 28 contains the END directive, which you already know.
And that’s all about the program itself! But before we finish up - I’ll tell you the secret of the number 162.
You might notice that register 0x11 decreases its value every time register 0x10 changes its value from 1 to 0. After which register 0x10 should decrease 255 times before this happens again. Let’s calculate the overall number of the delay loop iterations. Approximately it can be calculated as 162 x 256 = 41472. I say “approximately” because the first time register 0x10 starts from 162 not 0, also decrementing register 0x11 adds some iterations, and so do the CALL and RETLW instructions. We should count them when we need small delays (in the microseconds) but for what we’re doing right now, there’s no need for high precision.
The DECFSZ instruction requires 1 cycle of the microprocessor to execute, and GOTO instruction requires 2 cycles, which is 3 cycles in total. If you remember I mentioned that the CPU frequency of the PIC10F200 microcontroller is 4 MHz but each cycle requires 4 clock ticks which means that each cycle takes 1 microsecond. So now we can calculate the delay:
41472 iterations x 3 cycles x 1 microseconds = 124,416 microseconds or approximately 124 milliseconds which is very close to the required 125 milliseconds to get a 4Hz oscillation.
With the two registers the maximum delay is 256 x 256 iterations x 3 cycles x 1 microsecond = 196,608 microseconds, or approximately 0.2 seconds.
But what to do if we need a longer delay? No problem - you can add a third register to the delay loop and thus you will have the maximum delay 256 x 256 x 256 iterations x 3 cycles x 1 microsecond = 50 seconds.
Conversely, for short delays you can use just one register, in this case the maximum delay may be 256 iterations x 3 cycles x 1 microseconds = 768 microseconds.
If you haven’t already, create a new project in MPLAB, copy the program text into the main. asm file, assemble it and load to the microcontroller. You will see the blinking LED2 with the frequency close to 4Hz. FYI - the overall code uses just 17 words of flash memory.
That’s it for this tutorial! We’ve learned 6 new instructions: OPTION, BCF, CALL, DECFSZ, MOVWF, and RETLW; with the previous 4 ones we already know almost ⅓ of all PIC10F200 instructions. Not bad, huh? Also, we’ve familiarized ourselves with how the subroutines are implemented in the PIC10F200, as well as how to perform a delay for a given period. If you want some homework to test your knowledge, write a program which will blink both LED1 and LED2 in alternate at 1Hz. At the beginning of the next tutorial, I’ll give you my solution but if you want to suggest your solution, throw it in the comments below!

Get the latest tools and tutorials, fresh from the toaster.

