LEDs and Forward Voltage
Published
I have to admit, I’m biased. I think LEDs are awesome. But, really, the reason I’m biased and love them so much is because they’re just so cool. I’ve found that as I replaced the bulbs in my home, there was a surprisingly high failure rate but that failure rate (for me, at least) has been decreasing over the last few years. So, with that problem, why would I still think they are so cool?
If the electronics in an LED bulb in your house can survive a couple months, it should last for decades. You can run them off of low voltage or high voltage but use very little power, have incredibly long lives, easily dimmable, non-toxic, and are physically tough. This is unlike incandescents that are inefficient and have a relatively fragile filament, though they are extremely cheap. Fluorescents are great for their efficiency but they stink at dimming and have mercury in them so they’re not only fragile but a hazardous material. Halogen is just crazy because they’re so hot you can’t even touch the bulbs without breaking them due to the oils on your hands.
So while the LEDs that screw into your mains power socket are great, the small (and not so small!) LEDs that you can play with as a hobbyist are just as much fun.
LEDs are Different
Let’s get this out of the way right away - you cannot treat LEDs like you would an incandescent bulb. Just like you cannot treat a fluorescent light like you would an incandescent, so it’s not like we’re breaking new ground here. Incandescent lights are incredibly easy to deal with but LEDs take a little love to get their full performance.
One Way Current Only!
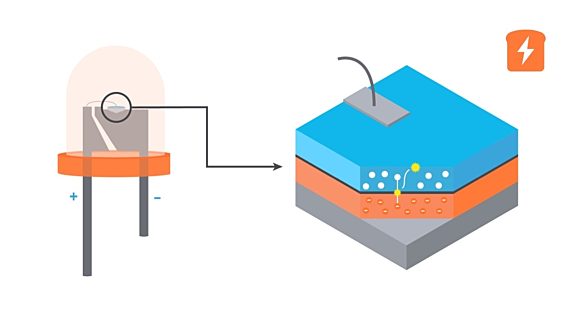
One of the biggest differences for an LED is that they’re a diode - Light Emitting Diode. LED. Diodes only allow electricity to flow in one direction and LEDs are the exact same. So, hooking an LED up backward will yield a lot more frustration than light. With a through-hole LED, you can tell the difference between the positive and negative, or anode and cathode, by the length of the leads and the internal structure of the LED. The negative leg, or the cathode, has a shorter leg but larger structure inside the LED itself.

Non-Linear I-V Curve of Doom
Another feature of LEDs is that their I-V or current versus voltage relationship is non-linear. When there is a reverse voltage, there is no current flow whatsoever, until the voltage becomes so great it just breaks down the junction completely and then conducts a lot of current. This is generally a bad thing unless you have a Zener diode - not something we’re getting into right now. But even once the voltage is positive, the diode won’t conduct until you’ve passed the forward voltage. But once you’ve passed that forward voltage, a consistent increase in voltage yields an ever greater current.

As LEDs can only take so much current before they fail (and this number varies wildly but is commonly 20mA for the “stereotypical” LED) this means that you either need to be very careful with the amount of voltage you put across an LED or, more commonly, put a resistor in series with the LED to limit the amount of current that will flow based off of the voltage level in the circuit.
Choosing the Correct Resistor
You need to identify a few things before you can choose the correct resistor. First - what’s the voltage in the circuit, VCC? Second, what is the forward voltage of the LED, VF? Third, how much current do you want to run through the LED, ILED?
With this information, you subtract the forward voltage of the LED from the voltage in the circuit, which will be the voltage across the resistor, which we’ll call VR. Then, using Ohm’s Law, you solve for the resistance of the resistor by dividing the voltage by the current.

And once you’ve figured out the correct resistor value, the fourth step is to figure out what power rating the resistor should have. With that, you simply multiply VR and ILED. We've even created a tool that makes this simple process even easier.

And, if you’re just doing a small personal project and you can, I’d at least double that power dissipation rating. ¼ watt and ½ watt resistors are very common and should be more than enough for the basic LED that you would hook up to a microcontroller.
Dimming
You may have heard that LEDs are very easily dimmed but then mentioned up above that a small change in the voltage can cause big changes in the current flow and thus the brightness of the LED. How is this seeming contradiction resolved? Behold, the power of the Pulse Width Modulation.

With PWM, and the fact that LEDs are very fast at turning on and off and don’t have any ill effects from doing so, you can run the LED at full power but at a very low duty cycle. Our eyes interpret this bright yet fast flashing as being dimmer. Something to note, though, is that cameras don’t always capture it the same way. Depending on the settings on your camera, you could see some terrible flashing in video or just weirdness when taking a picture. Won’t happen all the time, but something to think about.

When working on dimming, you should think of these things and try to consider what will work best for your scenario. How fast should it flicker? 60Hz may be fine for your eyes but could either subconsciously cause issues or be so slow that you run into those camera issues. But too fast means that your hardware needs to be more complicated and/or more expensive. And, light isn’t linear, so if you want to have a smoothly dimming light, you won’t want a linearly changing duty cycle. The best way to approach this is to familiarize yourself with the LEDs, which you’re doing, and then start experimenting!
LED Drivers and the Beauty of Current Sources

While an LED and a resistor being driven directly or with a PWM is not a bad way to go, if you’re interested in the highest efficiency and the greatest control, then a specific LED driver may be the way to go. In circuits, you learn about current sources but they’re so rarely used in real life, as mentioned in our tutorial on Voltage and Current Sources. However, for driving LEDs, they’re perfect! With a current source, you’re modulating the voltage directly to drive the LEDs at exactly the current that is best for them, and it automatically changes as you add more LEDs. Of course, reality is more complicated and there are some limitations, but if you’re doing a high power LED project, you may want to look into an LED driver made specifically for your application.
Summary
- LEDs are cool but they can be a little tricky.
- They are non-toxic, are very efficient, should last a really long time, and are tough.
- They are diodes - so current can only flow one way.
- As diodes, they also have a very steep, non-linear IV relationship.
- If you’re going to choose a resistor to protect your LED, do it right. We went over the steps.
- Dimming is typically done via PWM and can be easy to do unless you’re very demanding, and then it gets more challenging.
- There are some very smart people that have created ICs and even consumer/industrial products specifically for driving LEDs. If you’re learning and exploring, don’t use them. Otherwise, they’re an option.
Check Yourself
7 Questions

Get the latest tools and tutorials, fresh from the toaster.


