Musical Microcontroller - Part 8 Microcontroller Basics (PIC10F200)
Published
Note: Microchip recently made some changes and their newer IDE versions use the XC8 compiler for Assembly, whereas all sample code here is created for the MPASM compiler. However, the sample code has been ported to XC8 by user tinyelect on our Discord channel (to whom we are extremely grateful!) and the XC8 version of the code is at the bottom of this tutorial for your reference. To see the changes needed to switch from MPASM to XC8, please check out the process that he shared.
Hi again! This time we’ll put the LEDs aside and try something new. We will play music using a buzzer. Interestingly, some of the basic concepts are the same as with the LEDs but more precision is required and the output is wildly different.
First, here’s the homework solution:
#include "p10f200.inc"
   __CONFIG _WDT_OFF & _CP_OFF & _MCLRE_OFF

i   	 EQU   	 10   	 ;define 0x10 register as the PWM loop variable
limit       EQU   	 11   	 ;define 0x11 register as the PWM limit
j   	 EQU   	 12   	 ;define 0x12 register as the delay variable
dir   	 EQU   	 13   	 ;define 0x13 register as the brightness direction flag
    ORG 0x0000
INIT
    MOVLW ~(1 << GP1)          ;set GP1 as an output
    TRIS GPIO
    CLRF limit   		 ;Clear the PWM limit
    CLRF dir   		             ;Clear the direction register
LOOP
    MOVLW 0xFF   		 ;Set the initial value of i
    MOVWF i   			 ;as 0xFF
    BSF GPIO, GP1      	 ;Set GP1 pin
INT_LOOP   			 ;Beginning of the internal PWM loop
    MOVF limit, W   	             ;Copy the PWM limit value of the W register
    SUBWF i, W   		 ;Subtract the W from i
    BTFSS STATUS, Z   	 ;If the result is not 0
    GOTO $ + 2   		 ;then go to the line 22
    BCF GPIO, GP1   	             ;else reset the GP1 pin
    CALL DELAY   		 ;and call the DELAY subroutine
    DECFSZ i, F   		 ;Decrement the i, and check if the result is 0
    GOTO INT_LOOP    	 ;If not, return to the internal PWM loop start
    BTFSS dir, 0   	             ;If dir value is 0
    GOTO DEC_BRIGHTNESS;Then decrease the brightness the next iteration
    DECFSZ limit, F  	             ;otherwise decrease the PWM limit, check if it is 0
    GOTO LOOP   		 ;If it is not 0, then return to the main loop
    GOTO TOGGLE_DIR   	 ;Otherwise go to the TOGGLE_DIR label
DEC_BRIGHTNESS   	 ;Here we decrease the brightness
    INCF limit, F  	             ;Increase the PWM
    MOVLW 0xFF   		 ;Check if
    SUBWF limit, W   	             ;the limit
    BTFSS STATUS, Z   	 ;becomes 255
    GOTO LOOP   		 ;If not, then return to the main loop
TOGGLE_DIR   		 ;Otherwise toggle the direction
    BTFSS dir, 0   	             ;If the dir is 0
    GOTO SET_DIR   	             ;then go the the SET_DIR label
    BCF dir, 0   		             ;otherwise clear the bit 0 of the dir
    GOTO LOOP   		 ;and go to the main loop
SET_DIR   			 ;Here we set the dir register
    BSF dir, 0   		             ;Set the bit 0 of the dir
    GOTO LOOP   		 ;and return to the main loop

DELAY   			 ;Start DELAY subroutine here
    MOVLW 10   		 ;Load initial value for the delay
    MOVWF j   			 ;Copy the value to j
DELAY_LOOP   		 ;Start delay loop
    DECFSZ j, F   		 ;Decrement j and check if it is not zero
    GOTO DELAY_LOOP   	 ;If not, then go to the DELAY_LOOP label
    RETLW 0   			 ;Else return from the subroutine

    END
I’m not going to explain you every line as I didn’t use any new instructions or logic constructions, so you should be able to figure this. The common idea is in adding the new variable “dir” - for “direction” (line 7). If bit 0 of this variable is 0 (line 27) then the “limit” value is incremented at every iteration of the main loop (line 33) until it reaches the value 255. If that happens (lines 34-37) we toggle the bit 0 of the “dir” (lines 38-45). If bit 0 of “dir” is 1 then “limit” value is decremented at every iteration (line 29) until it becomes 0. When this happens the “dir” is toggled again and the implementation repeats.
This program uses 35 words of flash memory which makes it 1.5 times larger than the original one.
Here, TOGGLE_DIR is not optimized, which is why it uses so much space. I’ll explain one useful instruction later in this tutorial that can shorten this part significantly.
Playing the Music
Now let’s switch to the current task and do something more practical this time. We will develop a doorbell that will play a short melody when we press the button and then go into sleep mode for power saving. I selected “Fur Elise” by Ludwig Van Beethoven as it’s very famous and quite simple to implement using the limited microcontroller capabilities.
Before we get to the implementation, I have to give you some theory how music is created using a microcontroller. (I hope professional musicians will forgive me for this primitive explanation).
As you most likely know, music is made of notes. There are seven basic notes - C, D, E, F, G, A, B (or H). Also, there are some “half-notes” which are located between some of the basic notes, they are called sharps or flats. So with the sharps (or flats) there are 12 “notes”: C, C#, D, D#, E, F, F#, G, G#, A, A#, B (or H).
In Germany, Central and Eastern Europe, and Scandinavia, the B note is marked as H, while A# or Bb is marked as B.
Each note has its own frequency. As the foundation, we’ll use “A” and its frequency is 440 Hz. The frequencies of the neighboring notes can be calculated with the formula:

Yeah, music and mathematics are interconnected very tightly.
If you’ve ever seen a piano you might notice that there are more keys on it than 12. Yes, the notes are repeated. These 12 notes form an octave. And there can be several octaves on any musical instrument. The frequency of the same notes in the neighbor octaves differs by double. E.g. Note A at the first octave is 440Hz, and note A one octave above is 880Hz.
To play the music, we need to toggle the pin to which the buzzer is connected with the frequency corresponding to the required note frequency. And to make the music sound good we need to make the delay very precise or the notes will sound “out of tune”.
Let’s calculate the timing of the typical delay subroutine:

Here, d1 and d2 are values that are loaded to registers r1 and r2.
As you may notice, we load different values to both registers to increase the precision. Let’s calculate the delay depending on the d1 and d2 values.
DELAY(us) = 2(CALL) + 1*2(MOVLW) + 1*2(MOVWF) + 2(RETLW) + ((d1-1)+(d2-1)*256)*3
Don’t let the length of this equation concern you, there are a lot of pieces but it is very simple. The first part of the formula is constant, we always use CALL and RETLW, and load the values with MOVLW and MOVWF (we load two values which is why we multiply by 2). The other part depends on the d1 and d2 values. In the formula we use (d1-1) and (d2-1) because of the implementation of the DECFSZ instruction. When the value is 1 in the current iteration the next line is skipped, and thus we lose one delay.
You may ask “Seriously? We should calculate the delay for every note manually?” Fortunately I made this for you and calculated the delays for two entire octaves. You can see them in the table below:

The table is quite clear except perhaps the last column. It shows the approximate number of periods that each note needs to be played to make them last the same length of time. This number can vary depending on the tempo of the melody - how long you want each “standard” note to last. I want to warn you now that in the program below, these values are different.
Let’s now look at “Fur Elise” that we will convert into the digital form.
In figure 1 you can see the notes of this part:

I got these notes from here. As you can see, they are adapted for beginners, so the name of each note is written inside it. You also might notice that the notes look different. Some of them have a “tail” and others don’t. The “tail” says that the duration of playing of the note is ⅛ of the full note, which is some semi-arbitrary value that depends on the tempo. The notes without the “tail” have a duration of ¼, and the dot near them shows that the duration should be increased 50%, so the full duration of them is ⅜. That means that these notes should sound 3 times longer than the notes with the tails, or the eighth notes. You can do it by increasing the number of periods 3 times or you can just play the note three times in a row (I will use this option). So the consequence of the notes (with the same duration and without pauses) to play this part is the following:
E2 D#2 E2 D#2 E2 B1 D2 C2 A1 A1 A1 C1 E1 A1 B1 B1 B1 E1 G#1 B1 C2 C2 C2
This part consists of 23 notes which are formed with just nine unique notes:
E2, D#2, B1, D2, C2, A1, C1, E1, G#1.
We have their parameters in the table so we aren’t expecting any problems.
Now, before we move to the programming, let’s change our schematics and add the buzzer to it. The updated schematic diagram is shown in figure 2.
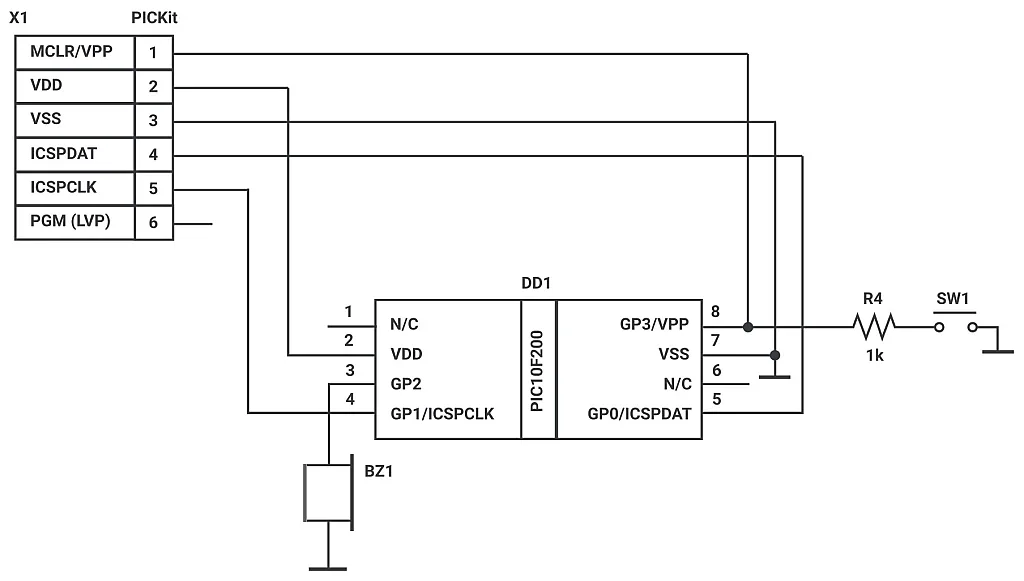
The schematic diagram shown in figure 2 can only be used if you have a piezoelectric buzzer. If for some reason you’ve purchased an electromagnetic buzzer (like I have, thanks to Aliexpress!) then you will need to update the schematics and add the transistor to it (you can use either an NPN BJT as shown in figure 3 or a MOSFET).
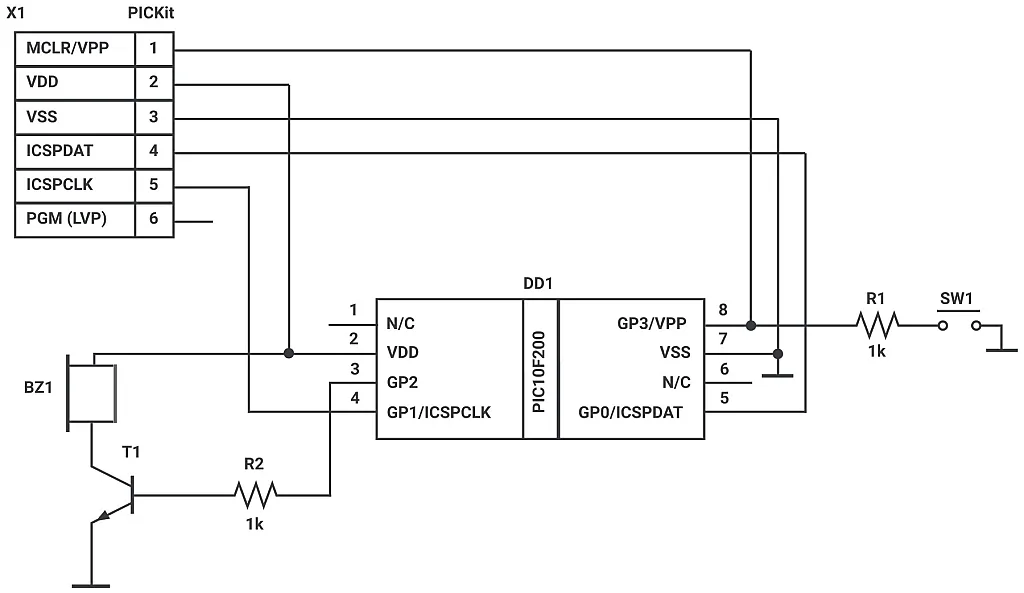
You may ask “How can I distinguish between the buzzers?” If you have an ohmmeter or multimeter, you can measure the resistance between its pins. If it is several kOhms then you have a piezoelectric buzzer, and if it is less than 20 ohms, then you are “lucky” enough to have an electromagnetic buzzer. If you don’t have an ohmmeter you can assemble the schematics according to figure 2 and run the program. If you hear noise and clicks instead of the melody then most likely you have electromagnetic buzzer and you need to update your schematic according to figure 3.
The T1 transistor in figure 3 can be almost any part number. It just needs to be npn type. Personally I used BC639 just because I found it first :)
OK, now we have everything so the program can implement the current task. I want to warn you that it is very long. But don’t be afraid, it’s built with similar blocks, there is just a lot of them. Here we go:
#include "p10f200.inc"
	__CONFIG _WDT_OFF & _CP_OFF & _MCLRE_ON
	ORG 0x0000

d1   	    EQU   	 10   	 ;define 0x10 register as lower delay byte
d2   	    EQU   	 11   	 ;define 0x11 register as upper delay byte
periods    EQU   	 12   	 ;define 0x12 register as number of periods to play

INIT
    MOVLW  ~(1<<T0CS)         ;enable GPIO2
    OPTION
    MOVLW ~(1 << GP2)          ;set GP2 as an output
    TRIS GPIO
LOOP
    CALL E2   			 ;Play note E of the 2nd octave
    CALL D#2   		             ;Play note D# of the 2nd octave
    CALL E2                              ;and so on and so forth
    CALL D#2
    CALL E2
    CALL H1
    CALL D2
    CALL C2
    CALL A1
    CALL A1
    CALL A1
    CALL C1
    CALL E1
    CALL A1
    CALL H1
    CALL H1
    CALL H1
    CALL E1
    CALL G#1
    CALL H1
    CALL C2
    CALL C2
    CALL C2
    SLEEP   			 ;Enable sleep mode
    GOTO LOOP     		 ;loop forever

E2  				 ;Note E of the 2nd octave
    MOVLW D'255'   	             ;Load the number of periods to play
    MOVWF periods
LOOP_E2   			 ;Toggle pin GP2 with the specified frequency
    MOVLW (1<<GP2)
    XORWF GPIO, F      	 ;Toggle GP2
    MOVLW D'251'
    MOVWF d1   		 ;Load lower delay byte
    MOVLW 1
    MOVWF d2   		 ;Load upper delay byte
    CALL DELAY   		 ;Perform delay
    DECFSZ periods, F             ;Decrease the number of periods and check if it is 0
    GOTO LOOP_E2   	 ;If no then keep toggling GP2
    RETLW 0   			 ;Otherwise return from the subroutine

D#2
    MOVLW D'240'
    MOVWF periods
LOOP_D#2
    MOVLW (1<<GP2)
    XORWF GPIO, F
    MOVLW D'10'
    MOVWF d1
    MOVLW 2
    MOVWF d2
    CALL DELAY
    DECFSZ periods, F
    GOTO LOOP_D#2
    RETLW 0

H1
    MOVLW D'191'
    MOVWF periods
LOOP_H1
    MOVLW (1<<GP2)
    XORWF GPIO, F
    MOVLW D'80'
    MOVWF d1
    MOVLW 2
    MOVWF d2
    CALL DELAY
    DECFSZ periods, F
    GOTO LOOP_H1
    RETLW 0

D2
    MOVLW D'227'
    MOVWF periods
LOOP_D2
    MOVLW (1<<GP2)
    XORWF GPIO, F
    MOVLW D'26'
    MOVWF d1
    MOVLW 2
    MOVWF d2
    CALL DELAY
    DECFSZ periods, F
    GOTO LOOP_D2
    RETLW 0

C2
    MOVLW D'202'
    MOVWF periods
LOOP_C2
    MOVLW (1<<GP2)
    XORWF GPIO, F
    MOVLW D'61'
    MOVWF d1
    MOVLW 2
    MOVWF d2
    CALL DELAY
    DECFSZ periods, F
    GOTO LOOP_C2
    RETLW 0

A1
    MOVLW D'170'
    MOVWF periods
LOOP_A1
    MOVLW (1<<GP2)
    XORWF GPIO, F
    MOVLW D'121'
    MOVWF d1
    MOVLW 2
    MOVWF d2
    CALL DELAY
    DECFSZ periods, F
    GOTO LOOP_A1
    RETLW 0

C1
    MOVLW D'101'
    MOVWF periods
LOOP_C1
    MOVLW (1<<GP2)
    XORWF GPIO, F
    MOVLW D'123'
    MOVWF d1
    MOVLW 3
    MOVWF d2
    CALL DELAY
    DECFSZ periods, F
    GOTO LOOP_C1
    RETLW 0

E1
    MOVLW D'127'
    MOVWF periods
LOOP_E1
    MOVLW (1<<GP2)
    XORWF GPIO, F
    MOVLW D'248'
    MOVWF d1
    MOVLW 2
    MOVWF d2
    CALL DELAY
    DECFSZ periods, F
    GOTO LOOP_E1
    RETLW 0

G#1
    MOVLW D'160'
    MOVWF periods
LOOP_G#1
    MOVLW (1<<GP2)
    XORWF GPIO, F
    MOVLW D'144'
    MOVWF d1
    MOVLW 2
    MOVWF d2
    CALL DELAY
    DECFSZ periods, F
    GOTO LOOP_G#1
    RETLW 0

DELAY   			 ;Start DELAY subroutine here
    DECFSZ d1, F   	             ;Decrement the register 0x10 and check if not zero
    GOTO DELAY   		 ;If not then go to the DELAY_LOOP label
    DECFSZ d2, F   	             ;Else decrement the register 0x11, check if it is not 0
    GOTO DELAY   		 ;If not then go to the DELAY_LOOP label
    RETLW 0   			 ;Else return from the subroutine

    END
Terrific, isn’t it? I warned you!
So let’s consider what is written here - obviously we’re not going to go line by line.
If you are attentive you might notice the first difference from previous programs is in line 2. Here we use _MCLRE_ON instead of _MCLRE_OFF. This means that we want to use the MCLR/GP3 pin as a Reset pin. The logic of the program is that after reset it plays the musical fragment and then goes to sleep mode. And to wake it up we just reset the microcontroller to start the program from the beginning.
d1   	    EQU   	 10   	 ;define 0x10 register as lower delay byte
d2   	    EQU   	 11   	 ;define 0x11 register as upper delay byte
periods     EQU   	 12   	 ;define 0x12 register as number of periods to play
In lines 5 to 7, we define 3 values “d1”, “d2”, and “periods”, their meaning corresponds to the table above. “d1” and “d2” provide correct delay, and “periods” provides the number of periods to play a certain note.
INIT
    MOVLW  ~(1<<T0CS)         ;enable GPIO2
    OPTION
    MOVLW ~(1 << GP2)         ;set GP2 as an output
    TRIS GPIO
LOOP
In lines 9 to 14 there is nothing new, we already know how to configure GP2 as general-purpose output pin (see Part 6 if you forgot).
    CALL E2   			 ;Play note E of the 2nd octave
    CALL D#2   		     ;Play note D# of the 2nd octave
    CALL E2              ;and so on and so forth
    CALL D#2
    CALL E2
    CALL H1
    CALL D2
    CALL C2
    CALL A1
    CALL A1
    CALL A1
    CALL C1
    CALL E1
    CALL A1
    CALL H1
    CALL H1
    CALL H1
    CALL E1
    CALL G#1
    CALL H1
    CALL C2
    CALL C2
    CALL C2
In lines 15 to 37 we just call the subroutines that play notes according to the list of the 23 notes, written above. This is where the music is done!
SLEEP ;Enable sleep mode
In line 38 there is a new instruction - SLEEP. It puts the microcontroller in sleep mode, in which the oscillator is turned off and thus all operations are stopped. According to the datasheet, current consumption falls from 1.1mA in active mode down to 2.4uA in the sleep mode, about 1/500th the amount of power. To wake-up from sleep mode, we can use the “wake-up on pin change” functionality or just reset the microcontroller which we will do. “Wake-up on pin change” allows you to wake up on any change of any of GP0, GP1, GP3 pins.
E2  				     ;Note E of the 2nd octave
    MOVLW D'255'   	     ;Load the number of periods to play
    MOVWF periods
LOOP_E2   			     ;Toggle pin GP2 with the specified frequency
    MOVLW (1<<GP2)
    XORWF GPIO, F      	 ;Toggle GP2
    MOVLW D'251'
    MOVWF d1   		     ;Load lower delay byte
    MOVLW 1
    MOVWF d2   		     ;Load upper delay byte
    CALL DELAY   		 ;Perform delay
    DECFSZ periods, F    ;Decrease the number of periods and check if it is 0
    GOTO LOOP_E2   	     ;If no then keep toggling GP2
    RETLW 0   			 ;Otherwise return from the subroutine
In lines 41 to 54 there is a subroutine to play the E2 note. Let’s consider it in more detail.
In lines 42 and 43 we load the initial value to the “periods” register. As I told you, I changed the values in comparison to those given in the table above to make the melody slower.
In line 44 the loop of toggling the GP2 pin with the needed frequency is started.
Do you remember I promised you to show the instruction that can decrease the pin toggle code? I want to introduce it in line 46.
XORWF instruction (eXclusive OR between W and F registers) as follows from its name performs the logical operation “exclusive OR” between the file register given as operand 1 and W register, and write the result back to F or to W according to operand 2.
XOR returns a 1 when the number of inputs that are 1 is odd. In the case of 2 inputs, this means when one of the inputs and ONLY one of the inputs is a 1.
So in line 45, we load the value (1<<GP2) into the W register, and in the next line we perform XOR operation between GPIO and W registers and write the result back to the GPIO register. The value (1<<GP2) consists of “1” only at the bit GP2, while all other bits are “0”. I’ll remind that the XOR operation has the following truth table:

As you can see if we apply the XOR operation to “1” in X2 then the Y value is opposite to the X1. I marked these lines with the yellow color. The same happens in our case. If in the GPIO register, the bit value of the GP2 was 0 then after implementation of the line 46 it will become 1 and vice versa. So we can perform a bit toggle with just two lines, no need to make any checks or set/reset it separately!
In lines 47-50 we load the values of the “d1” and “d2” registers according to the table and then call DELAY subroutine in line 51.
In this program we moved the initialization of the delay registers from the DELAY subroutine because these values should be different for each note. This makes the program longer, unfortunately, but this is the price of the primitiveness of the PIC10F200.
Please pay attention that in line 51 we call the DELAY subroutine from the E2 subroutine which is allowed with the 2-level stack, and if we wanted to call a subroutine from the DELAY subroutine, then the stack would overflow and the behavior will become unpredictable.
In line 52 we decrease the “periods” value and check if the result is zero using the instruction DECFSZ. If it is not zero then the next line, 53, is implemented, and we return to line 44 with the GOTO instruction. Otherwise this line is skipped and line 54 is implemented, returning from the subroutine.
D#2
    MOVLW D'240'
    MOVWF periods
LOOP_D#2
    MOVLW (1<<GP2)
    XORWF GPIO, F
    MOVLW D'10'
    MOVWF d1
    MOVLW 2
    MOVWF d2
    CALL DELAY
    DECFSZ periods, F
    GOTO LOOP_D#2
    RETLW 0
Lines 56-69 contain the same code but for the note D#2 with its values of “periods”, “d1” and “d2”. In reality, all other subroutines just implement one of the notes - H1 (lines 71-84), D2 (lines 86-99), C2 (lines 101-114), A1 (lines 116-129), C1 (lines 131-144), E1 (lines 146-159), G#1 (lines 161-174).
DELAY   			     ;Start DELAY subroutine here
    DECFSZ d1, F   	     ;Decrement the register 0x10 and check if not zero
    GOTO DELAY   		 ;If not then go to the DELAY_LOOP label
    DECFSZ d2, F   	     ;Else decrement the register 0x11, check if it is not 0
    GOTO DELAY   		 ;If not then go to the DELAY_LOOP label
    RETLW 0   			 ;Else return from the subroutine
In lines 176-181, there is the well known DELAY subroutine but a bit reduced in comparison to previous programs. I just want to call your attention to the fact that the DELAY label is used both as the operand of the CALL and GOTO functions, depending on the need. This is freely allowed in the Assembly language.
And that’s all! As you can see, the longer the program, the shorter its description. At this point, you already know a lot, and need less and less of my hints. Now you can compile the program, load it into the microcontroller, and enjoy the classical music as its implemented by the microcontroller.
Our statistics today are quite modest. The program uses 142 words, which is more than half the available flash memory. And we learned just two new instructions - SLEEP and XORWF, so now we know 19 of 33!
Your homework for this tutorial will be to find the notes of your favorite song and try to implement it with the microcontroller. Please note that each musical note subroutine uses 12 words of flash memory, so you can’t load all 24 from the table - they just will not fit into 256 words. So you need to find a music fragment that only requires 12-16 different notes and play it.

Get the latest tools and tutorials, fresh from the toaster.

