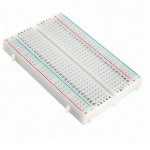
How to use a Breadboard
Published
With the amount of fully functional development boards out there, it’s possible that you won’t use a breadboard very often. However, if you spend enough time in electronics, it’s bound to happen sooner or later. While breadboards are fairly easy to use, a brief overview can reduce that learning curve to 0.
Breadboard Features

Breadboards come in different sizes and as they get bigger, they generally have a few more features. But there are a couple things that all breadboards have in common:
They’re a grid of holes separated by .1”

- This gives them a standard separation in each direction. This is helpful for many things but particularly ICs. If you notice with Dual-Inline Package (DIP) IC’s, they’re perfectly sized to fit into breadboards. Breadboards almost always have a center gap as well, which accounts for the separation of the two sides of a DIP IC.
As part of a grid, they have Rows

- A series of electrically connected holes. The rows are also separated in the middle.
They also have Columns

- Columns are not connected to each other. All the holes are separated by a tenth of an inch, so .1” pitch. This is standard because when you start using larger chips, like integrated circuits, the DIP packages fit right into the breadboards.
You can specify a hole using the row number and column letter.

- Using the number for the rows and letters for the columns you can specify a hole much like the game Battleship. If you’re interested. Maybe you just really miss playing that game - we won’t judge. More likely, using this method of specifying a hole is helpful when following instructions precisely or when you’re building a more complex breadboard and want to be able to document it properly.

Breadboard
Breadboard with power buses.
FROM OnlineComponents.com
More Features
As you get bigger, there are other features you’ll find:

- Buses on the side of the breadboard - commonly used for power and ground. Usually there are two buses on each side of the board. These are not connected side-to-side and they’re also divided in half top to bottom. This is helpful if you want a 5V rail and a 3.3V rail but, in my opinion, annoying otherwise.
- Some bigger breadboards have a stand and some rubber feet for a good grip. This is cool but the rubber feet sometimes fall off making the breadboard wobbly. It’s a small but annoying thing. If the breadboard has a separate base, they usually have connectors off to the side that make it easier to hook up a power supply using a banana plug.

Common mistakes or pitfalls

- Be careful about wires touching where they shouldn’t when they’re plugged in. With long leads, some of your components can touch each other unintentionally. Depending on how permanent your breadboard is and the cost of the components, you could consider trimming the leads to the appropriate length. But, if you do that and then move parts around and they no longer reach, that is an unfortunate frustration.
- Plugging into the wrong holes connecting things that shouldn’t be connected and not connecting things that should. This seems to be most frequently done with power and ground. Color coding and taking your time will help this.

- Not getting the wires all the way in to make contact, they can be tough. While difficult to see, if you pay attention, you can tell if the jumper wire or resistor lead or whatever is actually going in. If you only press it up to the internal contact but don’t get it in, it either won’t work, or worse, will work intermittently, which is incredibly frustrating to debug.
- Messy breadboards - long, out-of-control jumpers, criss-crossing wires and random placement of components. Messy breadboards with wires all over the place are hard to follow and troubleshoot. Take a breath, take your time, and try and make your breadboard more organized and prettier. And, if possible, color code things.
Check Yourself
7 Questions

Get the latest tools and tutorials, fresh from the toaster.


