Intermediate Electronics
Last part of the PID control system tutorial series covering embedded C programming for ...
Last part of the PID control system tutorial series covering embedded C programming for temperature control with PID. It focuses on a hands-on ...
Last part of the PID control system tutorial series covering embedded C programming for temperature control with PID. It focuses on a hands-on approach for learners.
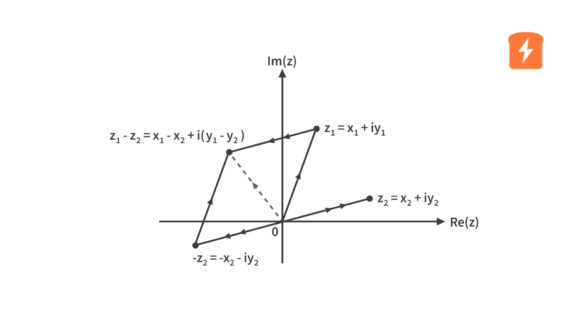
This tutorial offers a deep dive into complex numbers from an engineering mathematics ...
This tutorial offers a deep dive into complex numbers from an engineering mathematics perspective. It touches on the complex plane, algebraic ...
This tutorial offers a deep dive into complex numbers from an engineering mathematics perspective. It touches on the complex plane, algebraic operations on complex numbers, and ...
This tutorial guides through the process of Renesas RL78 and 1602 LCD interfacing, discussing ...
This tutorial guides through the process of Renesas RL78 and 1602 LCD interfacing, discussing the necessary functions and hardware connections.
This tutorial guides through the process of Renesas RL78 and 1602 LCD interfacing, discussing the necessary functions and hardware connections.
Learn to create a microsecond delay function in the Renesas RL78 MCU using the Timer Array ...
Learn to create a microsecond delay function in the Renesas RL78 MCU using the Timer Array Unit (TAU) with instructions on TAU Configuration and ...
Learn to create a microsecond delay function in the Renesas RL78 MCU using the Timer Array Unit (TAU) with instructions on TAU Configuration and Registers.
Understand the essence of Automated Temperature Control, how PID Control System is integral to ...
Understand the essence of Automated Temperature Control, how PID Control System is integral to it, and how Embedded C Programming plays a part in ...
Understand the essence of Automated Temperature Control, how PID Control System is integral to it, and how Embedded C Programming plays a part in making it possible.
Learn about the practical application of embedded C programming through creating a PID ...
Learn about the practical application of embedded C programming through creating a PID controller to regulate temperature, alongside an understanding ...
Learn about the practical application of embedded C programming through creating a PID controller to regulate temperature, alongside an understanding of automated control theory.
Covering concepts such as Electric Force, Coulomb's Law, electric charge, and ...
Covering concepts such as Electric Force, Coulomb's Law, electric charge, and electromagnetism, this piece offers comprehensive insights into these ...
Covering concepts such as Electric Force, Coulomb's Law, electric charge, and electromagnetism, this piece offers comprehensive insights into these fundamental physics concepts.
In this tutorial, explore the steps to create a digital and analog clock using the internal ...
In this tutorial, explore the steps to create a digital and analog clock using the internal RTC module of the RA2A1 MCU and OLED display. A great ...
In this tutorial, explore the steps to create a digital and analog clock using the internal RTC module of the RA2A1 MCU and OLED display. A great resource for beginners and ...
Using CircuitBread's tutorial, you will understand all about RL78's 12-bit interval timer. ...
Using CircuitBread's tutorial, you will understand all about RL78's 12-bit interval timer. Additionally, it empowers you with the knowledge to create ...
Using CircuitBread's tutorial, you will understand all about RL78's 12-bit interval timer. Additionally, it empowers you with the knowledge to create an exclusive millisecond ...
The guide provides valuable insights into porting the Arduino OLED Library to the Renesas RA. ...
The guide provides valuable insights into porting the Arduino OLED Library to the Renesas RA. It offers detailed line-by-line descriptions of sample ...
The guide provides valuable insights into porting the Arduino OLED Library to the Renesas RA. It offers detailed line-by-line descriptions of sample codes and interfacing display ...
The article provides a walkthrough of interfacing MCU modules for a 1602-character LCD with an ...
The article provides a walkthrough of interfacing MCU modules for a 1602-character LCD with an HD44780 driver. It provides a unique perspective on ...
The article provides a walkthrough of interfacing MCU modules for a 1602-character LCD with an HD44780 driver. It provides a unique perspective on LCD programming in C.
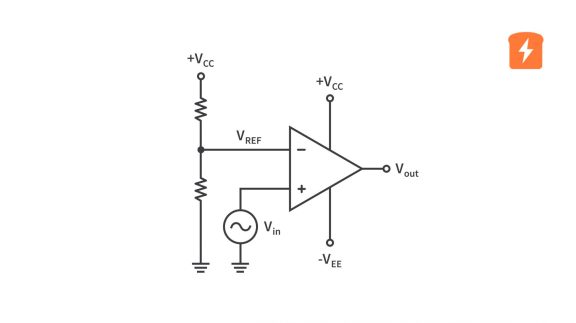
This article features how an Operational Amplifier (Op-Amp) Comparator works - from its basic ...
This article features how an Operational Amplifier (Op-Amp) Comparator works - from its basic functioning to its practical application and real-life ...
This article features how an Operational Amplifier (Op-Amp) Comparator works - from its basic functioning to its practical application and real-life performance consideration.
A tutorial about how to use the 1602 Character LCD with the HD44780 driver in embedded C ...
A tutorial about how to use the 1602 Character LCD with the HD44780 driver in embedded C programming, offering a hands-on guide to creating custom ...
A tutorial about how to use the 1602 Character LCD with the HD44780 driver in embedded C programming, offering a hands-on guide to creating custom characters.
In this tutorial, learn how to connect a 1602 LCD to the Renesas RA MCU efficiently. It covers ...
In this tutorial, learn how to connect a 1602 LCD to the Renesas RA MCU efficiently. It covers everything about redirecting 'printf' function for any ...
In this tutorial, learn how to connect a 1602 LCD to the Renesas RA MCU efficiently. It covers everything about redirecting 'printf' function for any display/interface.
Part 17 of our Embedded C Programming series dive into creating a digital piano with a matrix ...
Part 17 of our Embedded C Programming series dive into creating a digital piano with a matrix keyboard using the MCC Plugin. Explore Timer1 and ECCP ...
Part 17 of our Embedded C Programming series dive into creating a digital piano with a matrix keyboard using the MCC Plugin. Explore Timer1 and ECCP modules of the PIC18F14K50 MCU ...
Freshly launched content! We'll be adding more on a regular basis.
Question, comment or suggestion?


