Exploring Thread Interconnection and Semaphore Usage in Azure ThreadX | Renesas RA - 22
Published
Hi again! Today we will keep considering the Azure RTOS ThreadX. In the previous tutorial we have learned what this RTOS is, and what its main features are. Also, we created a project based on ThreadX, and studied it with the TraceX tool.
This time I will talk about one of the ThreadX services which provide communication between the threads and their synchronization. These services are not ThreadX specific, they are used in every RTOS. ThreadX uses the following communication methods: semaphores, mutexes, event flags, and message queues. We will consider all of them because they are very common in RTOS applications. In this tutorial we will start with the semaphores as one of the most widespread services (for more information about them please refer to the official Microsoft manual.
Introduction into Semaphores
Semaphores can be counting or binary, but in ThreadX there is only the first type. The counting semaphore is the resource at which two operations can be applied: put and get. The put operation increments the semaphore value by 1, and the get operation decrements the semaphore value by 1. Quite simple so far, huh?
One may ask: how can things like that implement the threads synchronization? There is one nuance: if the semaphore value is 0, and some thread implements the get operation, the semaphore value is not decreased, but the thread becomes suspended until some other thread implements the put operation. After that, the first thread becomes ready and can be executed once the scheduler gives the processor’s time to it.
So in this way the thread can come to some point when it needs the other thread to implement some certain action or to release some resource. The first thread implements the get operation at the semaphore and blocks itself until the second thread does what is needed and unblock it by implementing the put operation.
Let’s consider the following example: Thread1 implements the transmission of the data through UART, Thread2 and Thread3 have messages they want to send via UART. If they start transmission at the same time, there will be a total mess, so it should be done as following:
- When there is no data to transmit, Thread1 puts the semaphore and thus informs the other threads that the UART is free.
- If Thread2 wants to transmit the message, it tries to get the semaphore. If it has the value of 1, then the access is granted, and Thread2 sends the message to Thread1 to transmit it.
- If, at the same time, Thread3 also wants to transmit the message, it also needs to get the semaphore. But during execution of Thread2, the value of the semaphore is 0, and thus Thread3 gets suspended. Once Thread1 finishes the transmission of the message from Thread2, it puts the semaphore to indicate it is free once again, then Thread3 is unblocked and can, in its turn, send the message to Thread1 to transmit it.
In this way, access to a concurring resource is implemented without any collisions.
There are some things though which need to be taken care of when using semaphores. The first one is called “priority inversion”. I mentioned it in the previous tutorial but didn’t explain it in detail nor how it can happen.
In the previous example, imagine that Thread1 has priority 10, Thread2 and Thread3 have priority 5, and there is also some Thread4 with priority 7 which implements something not related to the UART. Thread3 becomes suspended as Thread1 didn’t put the semaphore. At the same time the scheduler gives all the processor’s time to Thread4 whose priority (7) is higher than the priority of Thread1 (10). Thus Thread1 cannot be executed and can’t unblock Thread3. So, in this situation, Thread4, which has lower priority than Thread3, won’t unblock the latter. And this is called “priority inversion”.
To avoid this you can either use the “preemption threshold” which prevents preemption of the specified thread by threads equal to or less than the preemption-threshold value, or temporarily increase the priority of the current thread to prevent its blocking.
The other thing that can happen with the threads when using semaphores, is called “deadly embrace” or “deadlock”. It happens when two threads mutually block each other for infinity using two semaphores. Thread1 gets Semaphore2 which blocks Thread2. But before being suspended, Thread2 in its turn gets Semaphore1 which blocks Thread1. In this situation only timeout of the get operation can unblock the threads.
Semaphore Example Program
Let’s now create a simple example with two threads: LED Thread which toggles the LED1 once it gets the semaphore, and Button Thread which puts the semaphore every time when button “USER BTN” is pressed.
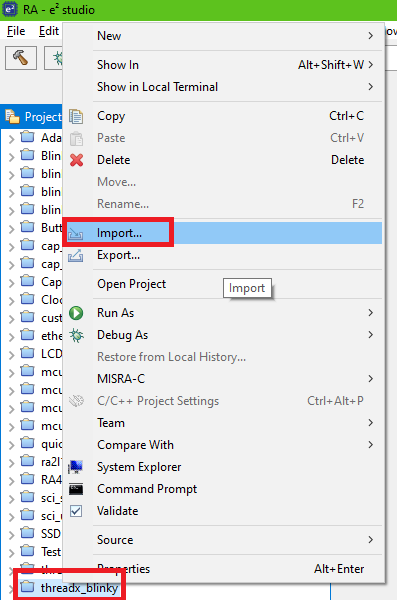
So we don’t have to create and configure a new project from scratch, let’s create the project based on the “threadx_blinky” which we have created in the previous tutorial. To do this, let’s open e2 studio, and in the Project Explorer in the left part of the window right click on the “threadx_blinky” project. Then in the drop-down menu select “Import…” (Figure 1).
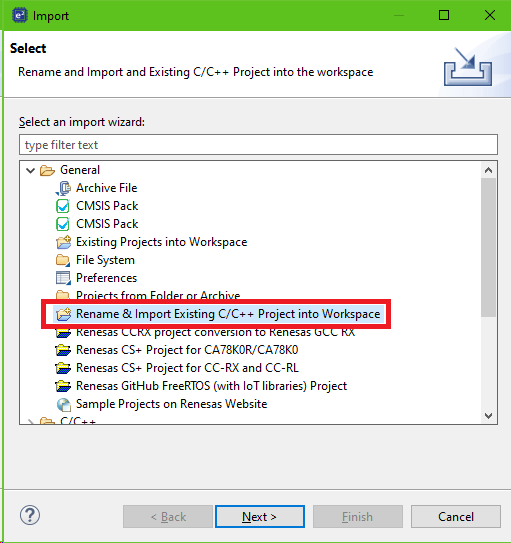
In the opened window select the point “Rename & Import Existing C/C++ Project into Workspace” (Figure 2) and then click “Next >”.
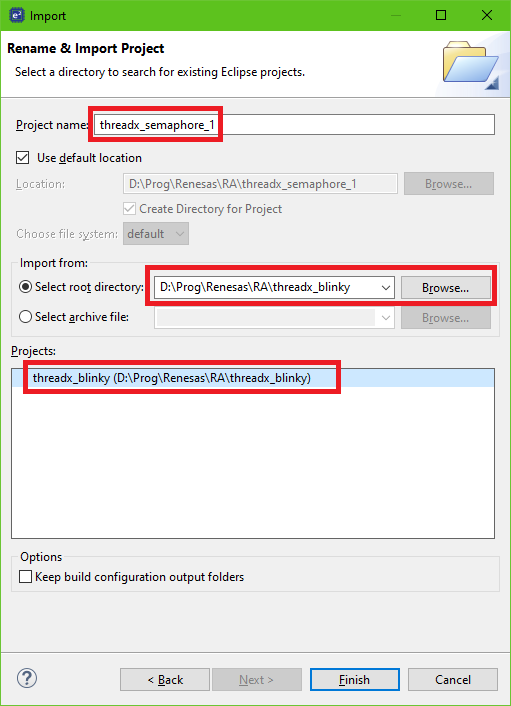
In the next step give the project a name. I called it “threadx_semaphore_1”. Then in the point “Select root directory:” click “Browse…” and browse to the folder where the “thread_blinky” project is located. Then click “Select folder”. Make sure that the “threadx_blinky” project has appeared in the “Projects” list and select it. After that the “Finish” button will become available (Figure 3), so click it to finish importing the project.
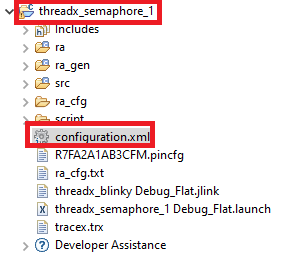
Now we have the “threadx_semaphore_1” project in the project explorer. Expand it and open the “Configuration.xml” file (Figure 4).
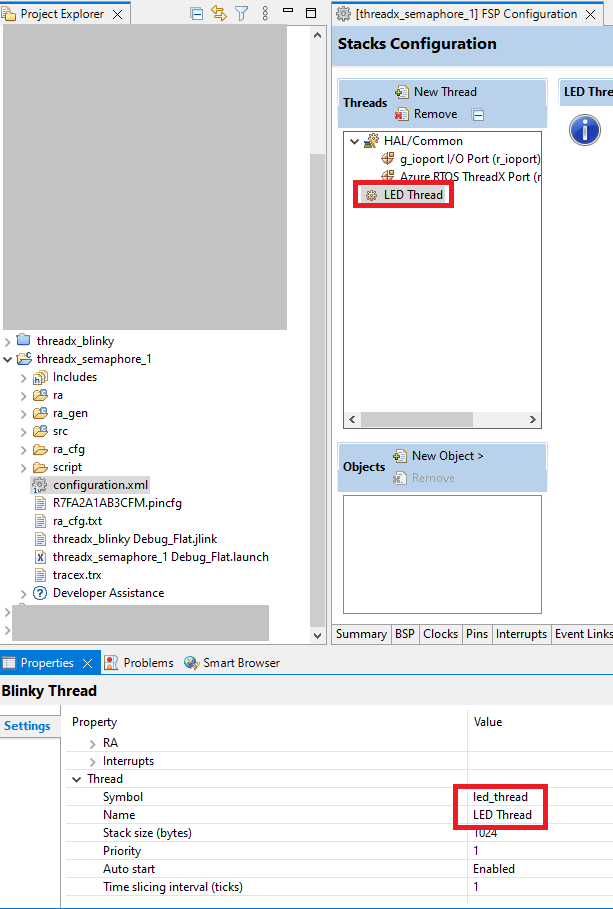
You can see that both the configuration and code are identical to the “threadx_blinky” project. Let’s switch to the “Stacks” tab and select the “Blinky Thread”. We will rename it to “LED Thread” but leave all other settings without changes (Figure 5).
Now let’s click on the “New Thread” button and create another thread which we will call “Button Thread”. All its properties except for the ones in the “Thread” group are common for the whole RTOS (Figure 6), so we will change only them.
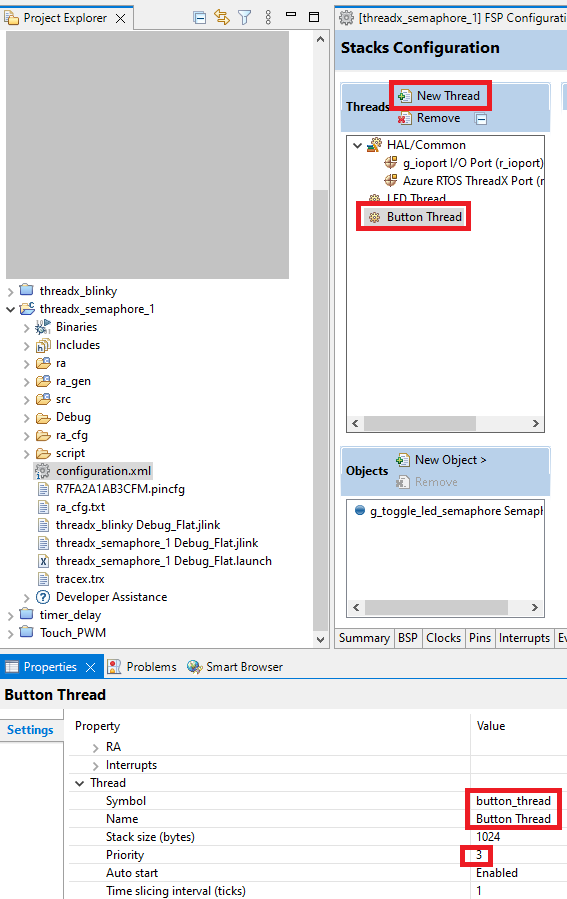
Let’s change the Symbol to “button_thread” and Name to “Button Thread”. Also, let’s set the priority of the current thread as 3, so it is now lower than the priority of the “LED Thread”, but this will not prevent normal operation, as the “LED Thread” is in the suspended state almost all the time.
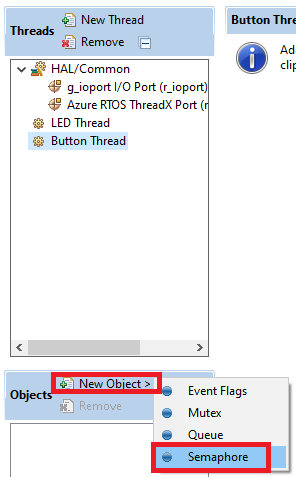
Now we need to add the semaphore to the project. To do this, we need to click the button “New Object >” and in the drop-down list select “Semaphore” (Figure 7).
Now let’s configure the semaphore’s properties. Actually, there are quite a few of them (Figure 8).
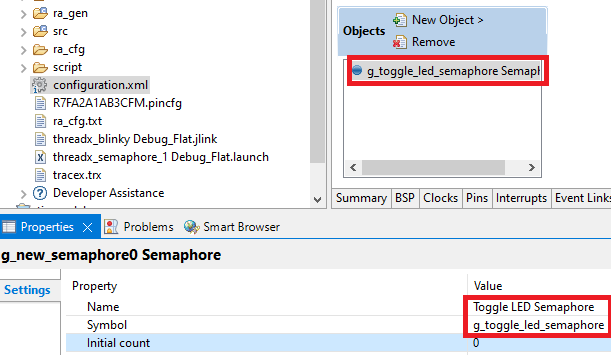
- “Name” is the name of the semaphore. It can be anything and consist of any characters. I called it “Toggle LED Semaphore”.
- “Symbol” is the name by which the semaphore will be used in the program, so this field should obey the rules of naming in the C language. Here I changed the default name to “g_toggle_led_semaphore”.
- “Initial count” is the initial value of the semaphore. If it is 1 initially, then the first get operation will not suspend the thread. But we don’t need the LED to toggle at startup so we will leave the initial count as 0.
Now we have everything ready and can click the button “Generate Project Content”. After that in the “src” folder of the project there will be three files: “button_thread_entry.c”, “hal_entry.c”, and “led_thread_entry.c”. As I mentioned in the previous tutorial, now we will write our code in the thread-related files.
Let’s start with the “led_thread_entry.c” file as it already has the code from the previous time.
#include <led_thread.h>

extern bsp_leds_t g_bsp_leds;   //Structure with all the LEDs of the boards

/* LED Thread entry function */
void led_thread_entry(void)
{
    bsp_io_level_t pin_level = BSP_IO_LEVEL_LOW;
    while (1)
    {
        tx_semaphore_get(&g_toggle_led_semaphore, TX_WAIT_FOREVER); //Get the semaphore
        pin_level ^= BSP_IO_LEVEL_HIGH;              //Toggle the pin level
        R_BSP_PinAccessEnable();        //Enable access to the GPIO registers
        R_BSP_PinWrite(g_bsp_leds.p_leds[0], pin_level); //Set the new pin level
        R_BSP_PinAccessDisable();  //Disable access to the GPIO registers
    }
}
As you can see, this program is very similar to the one described in the previous tutorial. So I will talk only about the differences.
In line 6 we need to rename the function name from blinky_thread_entry to led_thread_entry. For some reason when we rename the thread in the FSP configurator, the entry function name is not changed automatically, and the compiler shows an error while building.
In line 11 we call the function tx_semaphore_get which tries to get the semaphore. It has two parameters: the first one is the semaphore name which we want to get, in our case it’s the g_toggle_led_semaphore which we have created recently. The second parameter is the waiting option. It sets the time in ticks during which the thread will wait for a semaphore. If it can’t get the semaphore within this time, the execution of the thread will continue even without it. The waiting time can be in the range of 0x00000000 - 0xFFFFFFFF, where the border values have their own names.
0x00000000 is defined as the macro TX_NO_WAIT, and if it is set, the thread doesn’t wait for a semaphore at all, and continues its execution immediately.
0xFFFFFFFF is defined as the macro TX_WAIT_FOREVER, and if it is set, the thread will wait for the semaphore forever.
As you can see, in our program we set the last option, so the LED Thread will be blocked for infinity until it gets the semaphore. Once this happens, the execution of the thread continues, and lines 12-15 are implemented, in which the state of the LED is toggled. After that we get to line 11 again, and the thread is suspended, waiting for the semaphore to be put again.
As you see, everything is quite simple. It’s something like waiting for the interrupt flag to continue the program execution in a non-RTOS application.
Now let’s consider the code of the Button Thread located in the “button_thread_entry.c” file.
#include "button_thread.h"

/* Button Thread entry function */
void button_thread_entry(void)
{
    while (1)
    {
        if (R_BSP_PinRead(BSP_IO_PORT_02_PIN_06) == BSP_IO_LEVEL_LOW)  //If button is pressed
        {
           tx_thread_sleep(3);  	//Suspend the thread for 3 ticks
       	if (R_BSP_PinRead(BSP_IO_PORT_02_PIN_06) == BSP_IO_LEVEL_LOW) //If button is still pressed
       	{
           	    while (R_BSP_PinRead(BSP_IO_PORT_02_PIN_06) == BSP_IO_LEVEL_LOW); //Wait while it is pressed
           	    tx_thread_sleep(3);  	//Suspend the thread for 3 ticks
           	    if (R_BSP_PinRead(BSP_IO_PORT_02_PIN_06) == BSP_IO_LEVEL_HIGH) //If button is released
           	    {
                   tx_semaphore_put(&g_toggle_led_semaphore); //Put the semaphore
           	    }
       	}
        }
    }
}
This thread is a bit longer but still there is nothing difficult in it. Here we have the standard button processing. First we check if the button is pressed (line 8). Then we perform the debounce delay for 30 ms by invoking the tx_thread_sleep(3) function (line 10). Then we check again if the button is still pressed (line 11), and if yes, we wait while the button is pressed (line 13). Then we perform another debounce delay (line 14) and check if the button is truly released (line 15). And finally we perform the action that we need: put the semaphore by invoking the tx_semaphore_put function (line 17). This function has a single argument - the semaphore name to put. As this action is not blocking, there is no waiting time for it.
So, let’s consider how the whole system works together. After the reset, two threads are created and started: LED Thread and Button Thread. The first one almost instantly becomes suspended while waiting for the semaphore’s value to become greater than 0. In the second thread we continuously check the button state, and if it is pressed, we put the semaphore, and increment its value by 1. At the same time, the LED Thread becomes ready for execution, and, as it has higher priority than Button Thread, it preempts it and toggles the LED. After that the LED Thread becomes suspended again, and the whole process repeats.
Let’s now connect the board to the USB port of the PC, build the project and start the debugging. Run the project and see that when you press the user button on the board, the LED1 toggles. This means that the system works as desired. Let’s now press the Suspend button in the toolbar of e2 studio and copy the content of the TraceX buffer into the file as we did in the previous tutorial. All required views should already be opened. Please note that the address of the g_tx_trace_buffer variable can be different, so we need to check it again (Figure 9).

In my case the address is 0x20000210 but yours can be different, so take it into account in the next step.
Now in the Memory window remove the previous address and add the new one, then click the “Export” button (Figure 10).

In the opened window, select the file to export and the “Length”, all other fields should remain the same as the previous time (Figure 11).

Now let’s open the TraceX tool and select the just created file. Please note, that as the buffer size is not very large, you should press the user button shortly before suspending the execution of the program, otherwise you will not see anything interesting in the TraceX, just a lot of waiting.
In Figure 12 there is the graph of the program execution. I specially moved to the moment when the button was pressed to see how it is processed from the RTOS perspective.
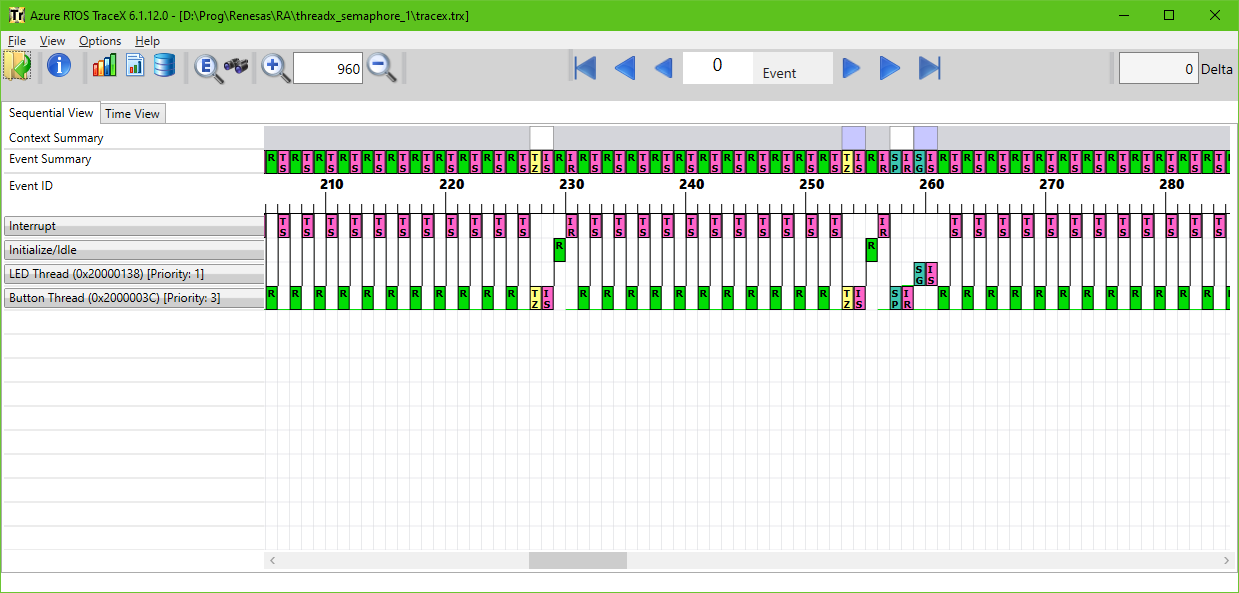
As you see, until the event #227 nothing interesting happens, and running the Button Thread (R block in the bottom line) alternates with the Interrupt caused by the time slicing event (TS). This is because the scheduler pauses the execution of the current thread after every tick and checks if there are any threads with the same or greater priority ready for execution.
The event #227 (TZ - Thread Sleep) is caused by pressing the button and the first debounce delay (line 11). This leads to the internal suspension of the thread (event #228 - IS) and puts the system in the idle state (event #229 - R) as both existing threads are suspended. Events #230-252 are the same as the ones before the event #227 but they happen while the button is held pressed (line 14). The next Thread Sleep (TZ) event #253 is caused by releasing the button and another debounce delay (line 15). The next three events (#254-256) are the same as events #228-231. After the button has been released the semaphore is put (line 18), this causes the corresponding event #257 SP. The next event #258 is internal release IR which is caused by ending the sleep of the thread. Right after the semaphore was put, the LED Thread becomes ready and preempts the Button Thread. First it gets the semaphore (event #259 SG) and then after toggling the LED (which is not related to the RTOS, and thus is not shown here) it suspends again waiting for the semaphore to be put (event #260 IS).
So this is how everything looks from the RTOS perspective.
Priority inversion and its prevention by temporary increasing the thread priority
Let’s now try to break the program and cause a priority inversion. To do this, let’s create one more thread - Dummy Thread with priority 2 which is higher than the priority of the Button Thread but lower than the priority of the LED Thread (Figure 13).
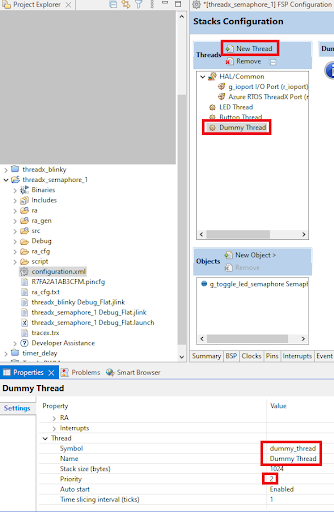
Then click the “Generate Project Content” button to create the file for the new thread - “dummy_thread_entry.c”. Let’s now open it and write the following code.
#include "dummy_thread.h"

volatile uint32_t i;
/* Dummy Thread entry function */
void dummy_thread_entry(void)
{
    while (1)
    {
        i++;
    }
}
As you can see, this thread does almost nothing, it just increments the variable i at every main loop iteration. This thread is needed just to waste the processor’s time.
Let’s now build and run the project with the three threads. If you press the button now, the LED will not toggle. This is because the Dummy Thread with the priority of 2 preempts the Button Thread which has priority 3 and doesn’t allow it to execute. Thus we can’t put the semaphore, and the LED Thread can’t execute even though its priority is greater than the priority of the Dummy Thread.
Let’s now see how this looks in the TraceX. Please note that the address of the g_tx_trace_buffer has been changed after adding the new thread. In my case it’s 0x200002EC now. So please add it in the Memory window like we did in Figure 10, 11. You can create a new “.trx” file or overwrite the existing one. It’s all up to you.
Let’s now open the shortly created file in the TraceX and see what happens there (Figure 14).
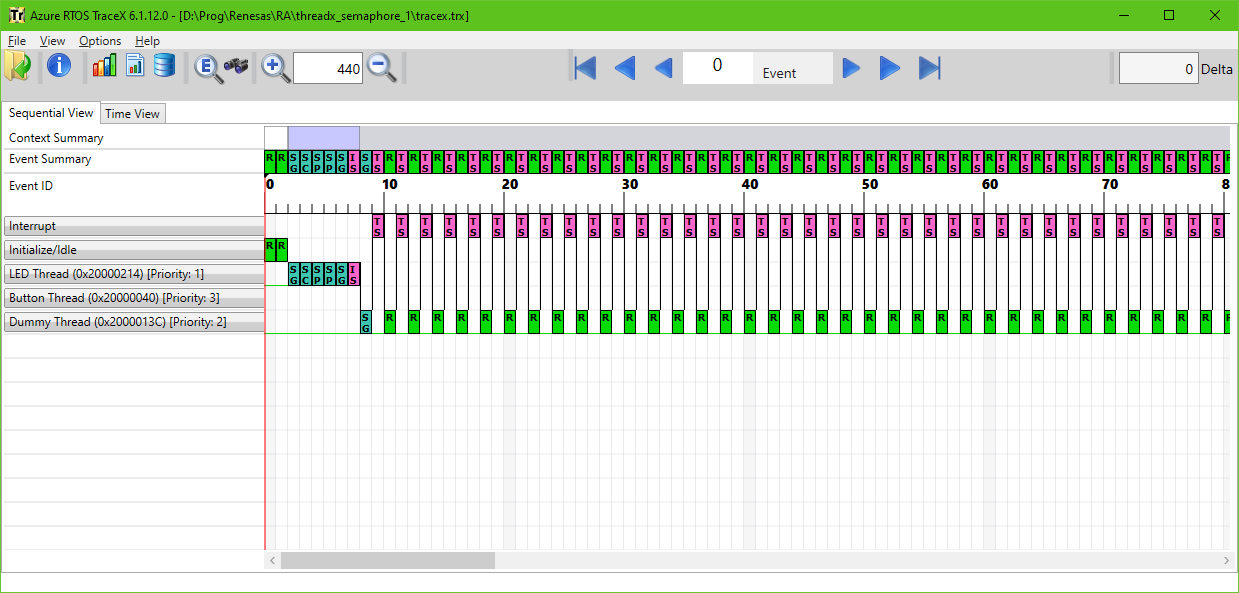
As you can see, the Button Thread never executes. The LED Thread is executed first as it has the highest priority. In event #7 it tries to get the semaphore “Toggle LED semaphore” (SG) and suspends (event #8, IS). After that the Dummy Thread runs, and it never is preempted or interrupted by other threads. So the Button Thread can’t execute at all.
As I said, there are several ways to solve this problem. The most common one is to temporarily increase the priority of the Button Thread while the LED Thread waits for semaphore, and return it to the initial state afterwards. The other method is applicable only in ThreadX RTOS, and is called “preemption threshold” as I mentioned before. In our case the first method is preferable, and I’ll explain later why.
Let’s now change the program so it can work normally again. The only file we will need to change is “led_thread_entry.c”.
#include <led_thread.h>

extern bsp_leds_t g_bsp_leds;         //Structure with all the LEDs of the boards
extern TX_THREAD button_thread;  //Button Thread structure

/* LED Thread entry function */
void led_thread_entry(void)
{
    UINT old_priority;                   //Previous priority of the thread
    bsp_io_level_t pin_level = BSP_IO_LEVEL_LOW;
    while (1)
    {
        tx_thread_priority_change(&button_thread, 2, &old_priority);//Change the priority of the Button Thread to 2
        tx_semaphore_get(&g_toggle_led_semaphore, TX_WAIT_FOREVER); //Get the semaphore
        tx_thread_priority_change(&button_thread, 3, &old_priority);//Change the priority of the Button Thread to 2
        pin_level ^= BSP_IO_LEVEL_HIGH;  //Toggle the pin level
        R_BSP_PinAccessEnable();       //Enable access to the GPIO registers
        R_BSP_PinWrite(g_bsp_leds.p_leds[0], pin_level);//Set the new pin level
        R_BSP_PinAccessDisable();      //Disable access to the GPIO registers
        tx_thread_sleep(10);                    //Suspend the thread for 100 ms
    }
}
In line 4 we declare the button_thread variable. Actually this variable is already declared in the “button_thread.c” file, that’s why we use the extern modifier. By this variable we can address the Button Thread and change its parameters.
In line 9 we declare the new variable old_priority. It will consist of the previous priority of the thread before changing its value.
In line 13 we invoke the tx_thread_priority_change function. As follows from its name, it changes the priority of the specified thread. It has three parameters:
- pointer to the thread which priority we need to change;
- new priority value;
- pointer to the variable where the previous priority is stored.
So right before getting the semaphore (line 14) we increase the priority of the Button Thread to 2. In this case the Button Thread and the Dummy Thread will alternate their execution while the LED Thread waits for the semaphore. If we want only the Button Thread to execute at this time, we can set its priority as 1.
After we get the semaphore, we decrease the Button Thread priority to the initial value (line 15). After that it will not be able to execute until the LED Thread tries to get the semaphore again. In practice, the lines 16-19 are executed very quickly and after that the priority of the Button Thread is increased again, so we can’t see any difference. That’s why I added some delay in line 20 during which LED Thread will be suspended, so we can see how lowering of the Button Thread priority will affect the operation of the program.
Let’s now build and run the program again. Now you can see that everything works as desired again, and when you press the button, the LED toggles.
Let’s see what’s going on there in the TraceX. To do this we need to export the g_tx_trace_buffer to the “.trx” file once again. And don’t forget to check the address of the g_tx_trace_buffer. The result is shown in Figure 15.
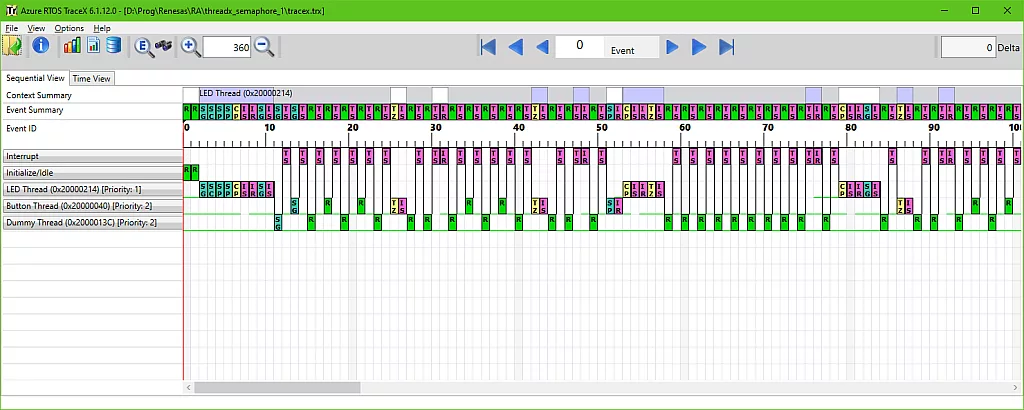
As you see, now there are many more events that happen during the execution of the program. Let’s try to deal with them. I will omit the explanation of the system events, like getting and putting the system semaphore, and will focus only on the events that are interesting to us. So even #3 (SC) is the creation of the Toggle LED Semaphore. For some reason it happens inside the LED Thread. I assume it’s done somewhere in the auto-generated files. Event #6 (CP) changes the priority of the Button Thread from 3 to 2, after which it suspends (events #7, IS), and immediately resumes (event #8, IR). It’s not mentioned explicitly but it is probably a standard routine of changing the thread priority.
After that LED Thread tries to get the semaphore (event #9, SG), and suspends (event #10, IS) because the semaphore is not put yet. Then the Button Thread and LED Thread start their execution altering each other (events #15-23, R).
When the button is being pressed, the Button Thread is suspended for 3 ticks implementing the debounce delay (events #25-26). You can see that between events #27 and #32 there is no execution of the Button Thread. Events #32-40 correspond to holding the button pressed. When the button is being released, the Button Thread is suspended for another 3 ticks (events #42-43), and again, the Dummy Thread is executed three times without interruption (events #44-49).
After that the semaphore is put (event #51, SP), and the LED Thread is resumed because of this (event #52, IR). As it has the higher priority, it preempts execution of other threads and executes itself. First, it reduces the priority of the Button Thread from 2 to 3 (event #53, CP), then it suspends itself (events #56-57) for 10 ticks. During this ticks (events #58-77) the Button Thread is not running because the Dummy Thread has now the higher priority.
Then the LED Thread wakes up (event #76, IR), increases the priority of the Button Thread again (event #79, CP), and tries to get the semaphore (event #82, SG), but as it hasn’t been put yet, the LED Thread suspends (event #83, IS), and the entire process repeats.
Prevention of the priority inversion using the preemption threshold
Now, about the preemption threshold. It’s an interesting thing but in our case it’s almost not applicable for several reasons:
- Using the preemption threshold doesn’t mean that the Button Thread will preempt the execution of the Dummy Thread. So to use this feature we need to run the Button Thread first, and to do this we need to suspend the Dummy Thread to let the Button Thread execute.
- When the Button Thread sleeps (which happens during the debounce delay), the Dummy Thread begins its execution, as now it’s the only thread ready, and after that the Button Thread will not be executed again. To prevent this we need to replace the tx_thread_sleep function with the R_BSP_SoftwareDelay one.
- In the current case using the preemption threshold will just be equal to suspension of the Dummy Thread for anytime the LED Thread is waiting for the semaphore, which means almost always. So it’s easier to just suspend the Dummy Thread manually by calling the tx_thread_suspend function.
Anyway, I will show you how to set up and use this feature, but again I repeat, this is not the best example for the preemption threshold usage.
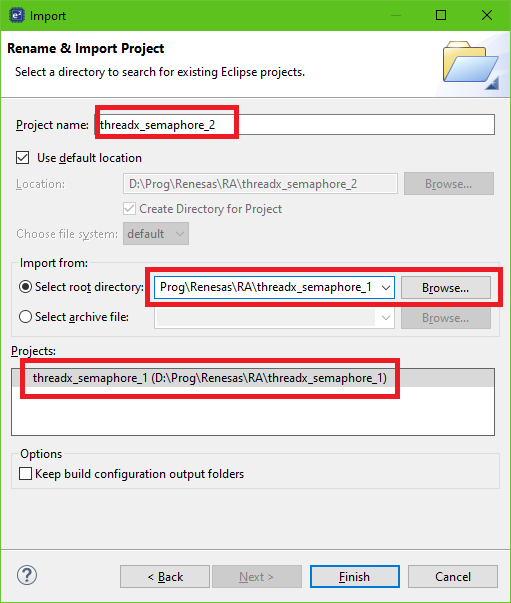
First of all let’s rename and import the new project the same as we did in the beginning of this tutorial but this time it will be based on the “threadx_semaphore_1” and called “threadx_semaphore_2” (Figure 16).
Then let’s open the “configuration.xml” file of the new project and switch to the “Stacks” tab. There, click on any thread, in the Properties window expand the “General” list and change the “Preemption Threshold” option from “Disabled” to “Enabled” (Figure 17).
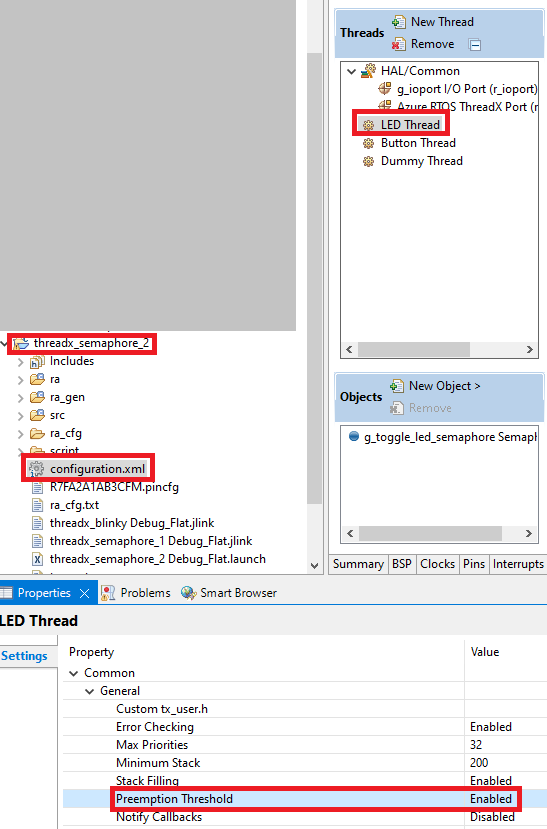
Now, the scheduler will know that we want to use this option, and when we call the corresponding function, it will process it correctly. These are all changes we need to do here, so we can click on the “Generate Project Content” button and switch to the “src” folder to open the source files.
The “dummy_thread_entry.c” file should remain unchanged, so let’s first make the changes in the “led_thread_entry.c” file (I marked them with the green color).
#include <led_thread.h>

extern bsp_leds_t g_bsp_leds;          //Structure with all the LEDs of the boards
extern TX_THREAD button_thread;   //Button Thread structure
extern TX_THREAD dummy_thread; //Dummy Thread structure

/* LED Thread entry function */
void led_thread_entry(void)
{
    UINT old_threshold;                  //Previous threshold of the thread
    bsp_io_level_t pin_level = BSP_IO_LEVEL_LOW;
    while (1)
    {
        tx_thread_preemption_change(&button_thread, 2, &old_threshold); //Change the preemption threshold of the Button Thread to 2
        tx_thread_suspend (&dummy_thread);         //Suspend the Dummy Thread
        tx_semaphore_get(&g_toggle_led_semaphore, TX_WAIT_FOREVER); //Get the semaphore
        tx_thread_preemption_change(&button_thread, 3, &old_threshold); //Change the preemption threshold of the Button Thread to 3
        pin_level ^= BSP_IO_LEVEL_HIGH;    //Toggle the pin level
        R_BSP_PinAccessEnable();          //Enable access to the GPIO registers
        R_BSP_PinWrite(g_bsp_leds.p_leds[0], pin_level); //Set the new pin level
        R_BSP_PinAccessDisable();       //Disable access to the GPIO registers
        tx_thread_sleep(10);                     //Suspend the thread for 100 ms
    }
}
In line 5 we declare the dummy_thread variable by which we will address the Dummy Thread. In line 10 we change the name of the variable from old_priority to old_threshold.
In line 14 we change the preemption threshold of the Button Thread by invoking the tx_thread_preemption_change function. Actually its parameters have almost the same meaning as in the tx_thread_priority_change function except for the second parameter, which here stands for the new preemption threshold. By setting this parameter to 2 we prohibit preempting the Button Thread to all threads whose priority is lower or equal than 2. So the Dummy Thread now can’t preempt it, but Button Thread can.
As I said, there is a problem here that Button Thread can’t start because of the Dummy Thread. That’s why we need to force it to suspend by invoking the tx_thread_suspend function (line 15). This function has only one argument which is the pointer to the thread which will be put into the suspended state after its implementation. Once we have suspended the Dummy Thread we need to resume it somewhere. We will do this later inside the Button Thread.
Now we have arranged all preparations, and we can wait for the semaphore to become put (line 16). After we finally get it, we lower the preemption threshold to let the Dummy Thread execute for some time (line 17). Actually it will be executed only while the LED Thread is suspended by sleeping for 10 ticks (line 22).
Now let’s consider the “button_thread_entry.c” file.
#include "button_thread.h"
extern TX_THREAD dummy_thread;                    //Dummy Thread structure
/* Button Thread entry function */
void button_thread_entry(void)
{
    CHAR *name; //Pointer to the thread's name
    UINT state; //Thread's current execution state
    ULONG run_count; //Thread's run count
    UINT priority; //Thread's priority
    UINT preemption_threshold; //Thread's preemption-threshold
    ULONG time_slice; //Thread's time-slice
    TX_THREAD *next_thread; //Next created thread pointer
    TX_THREAD *suspended_thread; //Next thread in suspension list
    while (1)
    {
        tx_thread_info_get(&dummy_thread, &name, &state, &run_count, &priority, &preemption_threshold, &time_slice, &next_thread,&suspended_thread); //Get the information about the Dummy Thread
        if (state == TX_SUSPENDED) //If Dummy Thread is suspended
            tx_thread_resume (&dummy_thread);   //Resume the Dummy Thread
        if (R_BSP_PinRead(BSP_IO_PORT_02_PIN_06) == BSP_IO_LEVEL_LOW)  //If button is pressed
        {
       	R_BSP_SoftwareDelay(30, BSP_DELAY_UNITS_MILLISECONDS);  	//Delay for 30 ms
       	if (R_BSP_PinRead(BSP_IO_PORT_02_PIN_06) == BSP_IO_LEVEL_LOW) //If button is still pressed
       	{
           	    while (R_BSP_PinRead(BSP_IO_PORT_02_PIN_06) == BSP_IO_LEVEL_LOW); //Wait while it is pressed
           	    R_BSP_SoftwareDelay(30, BSP_DELAY_UNITS_MILLISECONDS);  	//Delay for 30 ms
           	    if (R_BSP_PinRead(BSP_IO_PORT_02_PIN_06) == BSP_IO_LEVEL_HIGH) //If button is released
           	    {
                   tx_semaphore_put(&g_toggle_led_semaphore); //Put the semaphore
           	    }
       	}
        }
    }
}
Here are a lot of changes compared to the previous version. In line 2 we declare the dummy_thread variable to access the Dummy Thread.
In lines 6-13 we declare the bunch of variables which are required to call the tx_thread_info_get function (line 16). This function provides a lot of information about the specified thread. You can read more about it here. In our case we only need the thread’s state. If the Dummy Thread is suspended (line 17), we resume it by calling the tx_thread_resume function (line 18). After calling this function, the specified thread becomes ready but it can’t be executed due to the preemption threshold. It will remain ready until the LED Thread becomes suspended after getting the semaphore and preempting the Button Thread. We will see all this in the TraceX very soon.
As I mentioned before, we need to replace the tx_thread_sleep function with the R_BSP_SoftwareDelay in the debounce delay (lines 21, 25) to prevent the Button Thread from losing the running state.
Let’s now build and run the project, and make sure that the program works as desired: when we press the button the LED is toggled. It’s interesting to see how it all looks in TraceX. There is a problem here though. The tx_thread_info_get function is invoked with a very high frequency, so in most cases you will see the following graph (Figure 18).
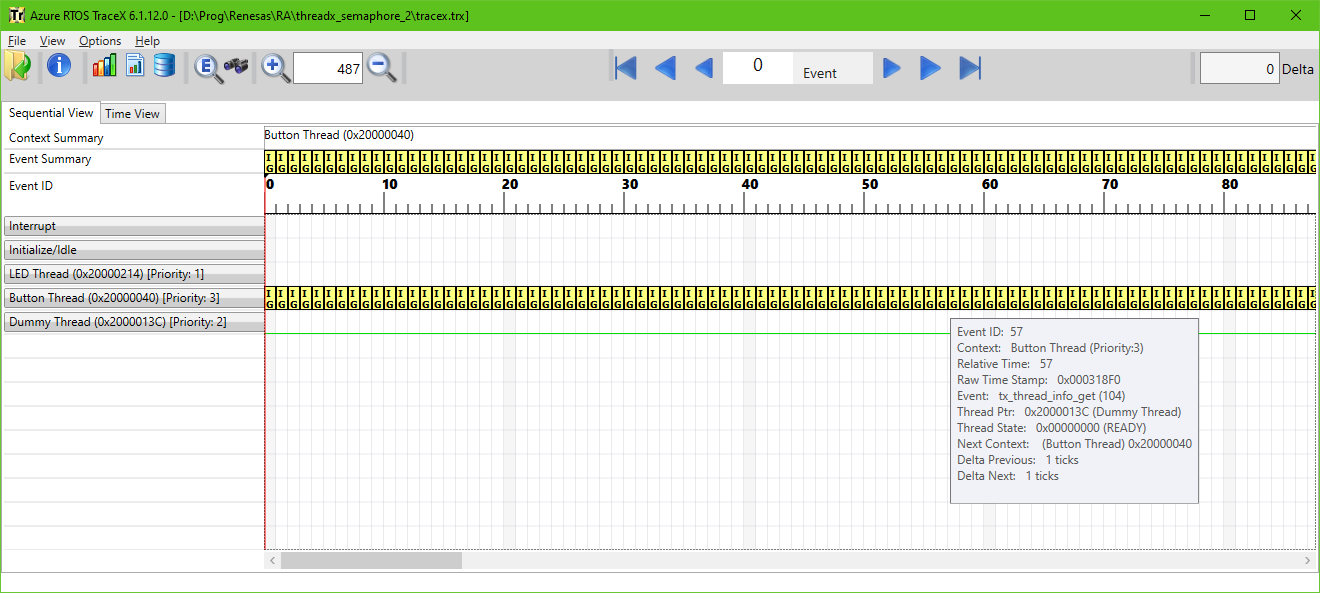
As you can see all blocks are the same and correspond to the tx_thread_info_get function (IG). You may also notice that the Dummy thread has the state READY but still can’t be executed. So the preemption threshold works.
I will leave the puzzle of how to get the correct graph on your own, I just will give you a hint that you will need the breakpoints at the Dummy Thread and the Button Thread. The graph of the part that is interesting to us, is presented in Figure 19.
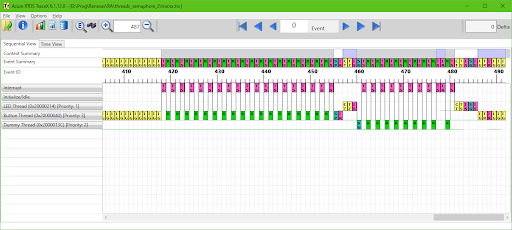
Event #419 (R) corresponds to the moment when the button has been pressed. As you see, the Button Thread now isn’t suspended because we got rid of the tx_thread_sleep functions in it. Event #455 (SP) corresponds to setting the the semaphore by the Button Thread, followed by event #456 (IR) which is the internal resume of the LED Thread.
Once the LED Thread becomes active, it lowers the preemption threshold of the Button Thread (event #457, CT), toggles the LED (this action is not reflected here), and goes to sleep (event #458, TZ). After that the Dummy Thread finally can be executed (events #460-479).
When the LED Thread wakes up (event #478, IR), it increases the preemption threshold of the Button Thread (event #481, CT), suspends the Dummy Thread (event #482, TS), and suspends itself waiting for the semaphore (event #484, SG).
After that the Button Thread becomes running, and first gets the information about the Dummy Thread (event #486, IG). As it is suspended, the Button Thread resumes it (event #487, TR), after which it becomes ready (event #488, IR). But due to the preemption threshold it can’t be executed until both Button Thread and LED Thread become suspended, as I mentioned before.
And this is all I wanted to tell you about the priority inversion and methods of its prevention. But these two methods are not the only ones. You should look at your code and the structure of the threads to select the most appropriate. For example in our case we could set the priority of the Button Thread as 2 initially and don’t have these troubles at all. Also we could just suspend the Dummy thread before getting the semaphore and resume it afterwards without any preemption thresholds. So you need to select the method which suits your system best and isn’t excessive and/or silly.
Deadly embrace (deadlock) and its prevention
Let’s now create a program which will demonstrate the deadly embrace while using two semaphores. To do this, we will import/rename the “threadx_blinky” project in the same way as I showed in Figure 1-3. But this time we will call the project “threadx_semaphore_3”. Then open the “configuration.xml” file of the new project and switch to the “Stacks” tab.
In this tab, let’s rename the “Blinky Thread” as “Thread1” (Figure 20) and create the new thread which will be called “Thread2” (Figure 21).


Also let’s create two semaphores: Semaphore1 and Semaphore2 (Figure 22, 23).


Finally your setup should look like the one in Figure 24.
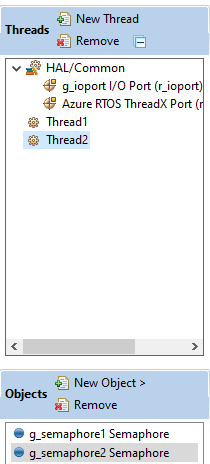
Now we can click on the “Generate Project Content” button, and switch to the “src” folder where we find “thread1_entry.c” and “thread2_entry.c” files.
The content of the “thread1_entry.c” file should be the following:
#include <thread1.h>

extern bsp_leds_t g_bsp_leds;       //Structure with all the LEDs of the boards
/* Thread1 entry function */
void thread1_entry(void)
{
    while (1)
    {
        tx_semaphore_get(&g_semaphore1, TX_WAIT_FOREVER); //Get the Semaphore1
        tx_semaphore_put(&g_semaphore2);  //Put the Semaphore2
        R_BSP_PinAccessEnable();   //Enable access to the GPIO registers
        R_BSP_PinWrite(g_bsp_leds.p_leds[0], BSP_IO_LEVEL_HIGH);	//Turn on the LED
        R_BSP_PinAccessDisable();    //Disable access to the GPIO registers
    }
}
As you see, the program is quite simple. First, the thread tries to get Semaphore1 (line 9), then it puts Semaphore2 (line 10), and finally turns on the LED (lines 11-13).
The content of the “thread2_entry.c” file is very similar:
#include <thread2.h>

extern bsp_leds_t g_bsp_leds;       //Structure with all the LEDs of the boards
/* Thread2 entry function */
void thread2_entry(void)
{
    while (1)
    {
        tx_semaphore_get(&g_semaphore2, TX_WAIT_FOREVER); //Get the Semaphore2
        tx_semaphore_put(&g_semaphore1);  //Put the Semaphore1
        R_BSP_PinAccessEnable();   //Enable access to the GPIO registers
        R_BSP_PinWrite(g_bsp_leds.p_leds[0], BSP_IO_LEVEL_LOW);	//Turn off the LED
        R_BSP_PinAccessDisable();    //Disable access to the GPIO registers
    }
}
Here we first try to get Semaphore2 (line 9) then put Semaphore1 (line 10) and finally turn off the LED (lines 11-13).
Theoretically, Thread1 should turn on the LED when it gets Semaphore1 which is put by Thread2. On the other hand, Thread2 will turn off the LED when it gets Semaphore2 which is put by Thread1. As there are no delays, the LED should be toggled at a high frequency, so it’ll look like it’s always on but with half-brightness.
Let’s build and run the project and see how this all works in practice. And in practice nothing works at all, and the LED stays off. Let’s now export the TraceX buffer into the file and see what it shows (Don’t forget to check the address of the g_tx_trace_buffer, it will be different).
TraceX shows a very short graph (Figure 25)
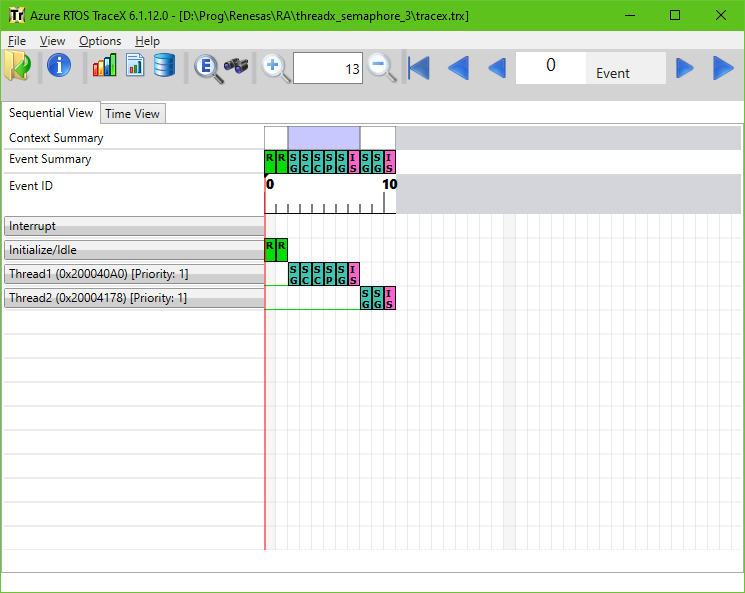
As you can see, after the initial setup (events #0-5) the Thread1 tries to get the Semaphore1 (event #6, SG), and as it is not put yet, the thread suspends (event #7, IS). The same happens with the Thread2 when it tries to get the Semaphore2 (event #9, SG and event #10, IS).
In this situation no thread can execute because each of them waits for the semaphore from another one. This situation can last forever.
The solutions for it are presented in the official ThreadX page. The first solution is to not set the TX_WAIT_FOREVER option in the tx_semaphore_get function but with some limited timeout. This will prevent total hanging of the threads. The other solution is to check the order of getting and putting the semaphores by the threads. So if we try to get some semaphore by one thread we need to put it first in another thread, and vice versa.
In our case we neglected this rule and got into trouble. To fix it we just need to swap the lines 9 and 10 in one of the files. For instance, let’s do it with the “thread2_entry.c” file”:
#include <thread2.h>

extern bsp_leds_t g_bsp_leds;       //Structure with all the LEDs of the boards
/* Thread2 entry function */
void thread2_entry(void)
{
    while (1)
    {
        tx_semaphore_put(&g_semaphore1);  //Put the Semaphore1
        tx_semaphore_get(&g_semaphore2, TX_WAIT_FOREVER); //Get the Semaphore2
        R_BSP_PinAccessEnable();   //Enable access to the GPIO registers
        R_BSP_PinWrite(g_bsp_leds.p_leds[0], BSP_IO_LEVEL_LOW);	//Turn off the LED
        R_BSP_PinAccessDisable();    //Disable access to the GPIO registers
    }
}
Now Thread2 first puts the Semaphore1 and suspends on waiting for the Semaphore2. Then Thread1 gets Semaphore1, puts Semaphore2, and suspends waiting for the Semaphore1 again. Thread2 becomes unblocked by Thread1 and puts Semaphore1 to unblock Thread2, and so on, and so forth. So, as you see, such a simple change can solve such a big issue.
But let’s now rebuild and run the program again. As you can see, everything works as desired, and the LED is turned on but dimmer than usual. Let’s export the TraceX buffer and see what the TraceX tool will show us (Figure 26).
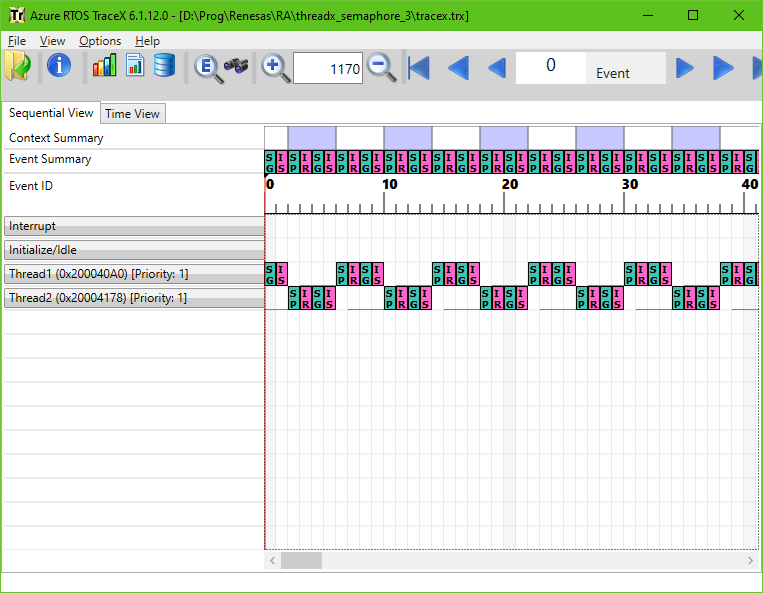
There is a repeating sequence of eight events: four at Thread1 and four at Thread2. Let’s consider events #2-9 in more detail. Thread2 puts Semaphore1 (event #2, SP), after which Thread1 resumes (event #3, IR). After that, Thread2 tries to get Semaphore2 (event #4, SG) and suspends (event #5, IS), as it is not put yet. After that, Thread1 starts running. It puts Semaphore2 (event #6, SP) resuming Thread2 (event #7, IR), then it tries to get Semaphore1 (event #8, SG) and suspends (event #9, IS). Then the process repeats in the loop.
And now, that's really all. This tutorial turned out to be much longer than I expected initially but I hope it will help you to prevent making common mistakes when using semaphores. Next time we will consider mutexes, which often are mixed up with the semaphores but in fact they have certain significant differences which I will show in the practical examples.
As homework, try to invent your own methods of preventing priority inversion and deadly embrace. Maybe you can think of something non-standard and effective. Then share your solution in the comments below this tutorial.

Get the latest tools and tutorials, fresh from the toaster.


