Operational Amplifier (Op-Amp) Practice Problems
Published
00:00:00 - Introduction
We introduced operational amplifiers in the last video and we talked about how using two simple principles they were quite easy to use and to calculate all the stuff around them. I realized that saying, “Hey, this is really easy” is not the same as actually showing you. In today's tutorial, all I'm going to do is go over three different operational amplifier circuits and show how you can use those two simple rules, which I'll go over again in a second, to solve these things in a very straightforward way.
00:00:30 - Review of the 2 Golden Rules

As a reminder the two rules that you need to remember with op-amps using this first version that I have as an example is that these two voltages are always going to be the same and that no current goes into these inputs. The first rule, these voltages will always be the same on the inputs and the second rule is that the inputs have no current going in or out of them.
00:00:56 - First Practice Problem
Let's jump into this realizing that I am horribly prone to making mistakes. I know how to do this. I just hope I don't make any small math errors and throw it all into disarray and that is why we always do that sanity check afterwards.
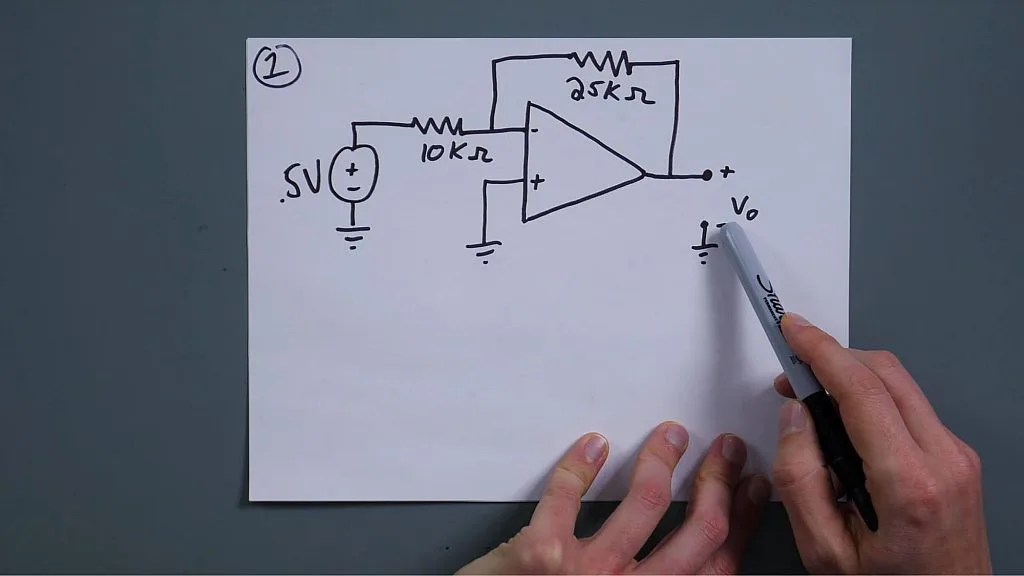
Jumping in this first one, I want to take our time, look at it, think about what are we doing, what are we looking for. We are trying to find VOUT (VO) and we can see that this input is tied to ground. We know that not only is this 0 volts, this right here is 0 volts. Now, once we know that, this immediately simplifies a huge amount because we have this voltage, this resistance, this resistance, and then this voltage, and we know that no current goes in here. The current through this resistor is the same as this resistor and since we know the current through this resistor because it's 0.5 volts minus 0 over 10k, then we know what this voltage is going to be. I just did that at a very high level. Let's actually work through it. As always, I like to put Ohm's law here in the corner. I don't know why. It just helps me visualize things better.

Let's find, I'll just call this i1, and so i1 is just going to be 0.5 volts minus 0 volts over 10 kilo ohms. But we can see that this is about 50 microamps or 0.05 milliamps. Thus we get 50 microamps as a current through there. Now we know the current through there because that 50 microamps isn't going through here, it is going all the way through.

Now we have our current going this way. Since we want to make sure we don't mess up our signs, this is still i1. We want to say that through that we have 0 minus i1 over 25. What am I doing not oops and immediately I see that this is why I have that uh ohms along the corner because that's not right I'm looking for the voltage, so VO is just going to equal i1 times 25000. That will just be 50 microamps times 25 kilo ohms which, let's punch that into the calculator, 0.000050 times 25000, gives us 1.25 volts and that's it.

This first one, we now know what i1 is through these two resistors which is 50 microamps and now we know what this voltage is, wait a second, that's minus, yes, yes, because, because of all of this I know that this is zero volts and for me to have a current flowing here, this has to be less than zero to keep that current flowing there.

I should have had that, so it is minus 1.25 volts, see this is why we look at things and we have that sanity check. We know that we can't have current flowing this way and current flowing this way because there's nowhere else for the current to go in this node. The current goes here, current goes there, which means that this has to be less than zero volts so that the current can flow out that way. All right, update! The current is 50 microamps and this voltage is negative 1.25 volts. See, even on these easy ones you can get messed up. With that, let's move on to the second one.
00:04:46 - Second Practice Problem
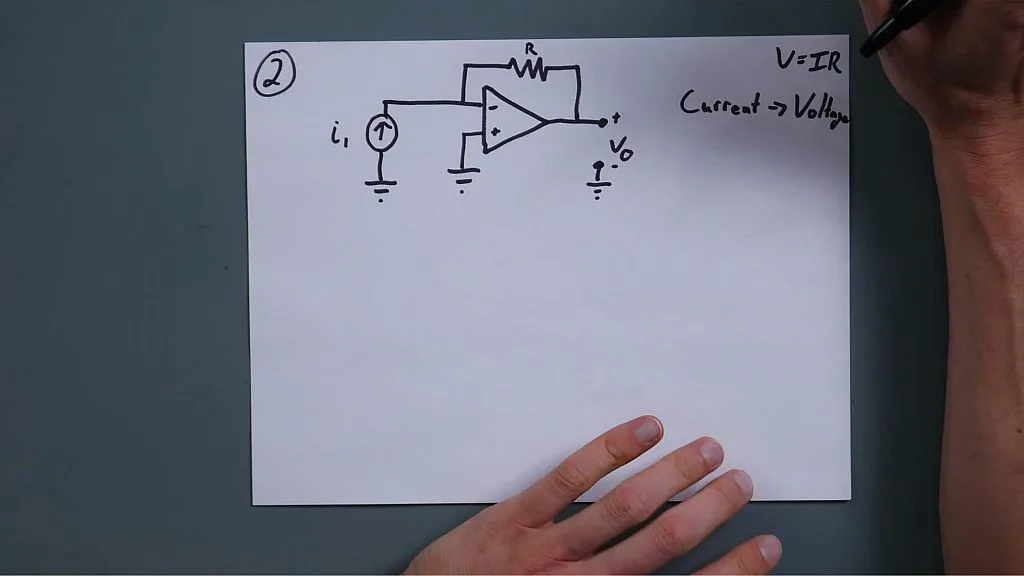
Hopefully I don't screw this one up again. This is actually what they call a current to voltage converter. There's a couple of ways to do it but this is one of the simpler ways and so we're not going to get actual numbers out of this but this is supposed to show you how you can take a current source and have a voltage output that you can understand and control. We're actually going to be looking for a relationship here. Now like with the last one, the previous demonstration we just did, you can look at this and you can say okay this is zero volts so you know that this is going to be zero volts right there because those two are matched and you know that this current coming through here is not going to go in there, so you know that your current through this resistor is i1. That seems pretty straightforward. All we're doing now is we're trying to find a relationship between i1 and our output voltage V0. Okay, since we already know, what, that this is i1, now we're simply going to put it in regards to our voltage.

Using Ohm's law, we can say basically that our, our current is going to be 0 minus V0 over R equals i1. All right and since we want this to be in a ratio, we will just move this stuff around. But this is already the answer. Immediately, the initial equation that we put together is the answer we're looking for. We're just going to put it in a way that's a little bit more convenient to work with. And since we want to know it using basically R as our, our multiplier, let's try and get R on its own side. Let's multiply both sides by R, that'll give us negative VOUT equals i1R and then we can divide that i1 from both sides and multiply that over so we have VOUT over i1 and that gives us VOUT over i1 equals negative R.

If I ever had a current source that I wanted to convert into a voltage output, I could use this and know that I can control the relationship simply by varying my value of R and then I would have a very linear response between the amount of current going in, the amount of voltage going out, and it'll be very nice. But that's really it. Again, this was made so simple by the fact that we knew that the inverting input is going to be 0 volts and that that current was just going to be going through that resistor and we can disregard all of the real life issues of “Oh, that's not going to be exactly zero volts and oh there might be a little bit of current in there”, we're not worrying about that at this point. You can worry about that later, don't worry about it. All right, let's go to number three.
00:07:34 - Third Practice Problem

For number three, this one might look a bit scary because on the last one we only had one resistor, now we have four resistors and a voltage source, and like “oh my goodness it's all going to heck”, no, it's not a problem. Still, we take our time and we look at it. Now unlike the other ones where it's very simple to just say, hey this one's tied to ground and we can assume the other one's gone, we have to do a little bit more calculation. But the first thing we do is we realize that on our positive, non-inverting, input, there is no feedback from the output. That is basically gonna be our set point. And so we have three volts here and we have what's obviously a very simple voltage divider. We have 4k and 8k because again no currents going through there so we can just assume that this is a voltage divider. 3 volts all that we know by inspection very simple math but that's going to be 2 volts because you're going to drop 1 volt over the 4k and 2 volts over the 8k.
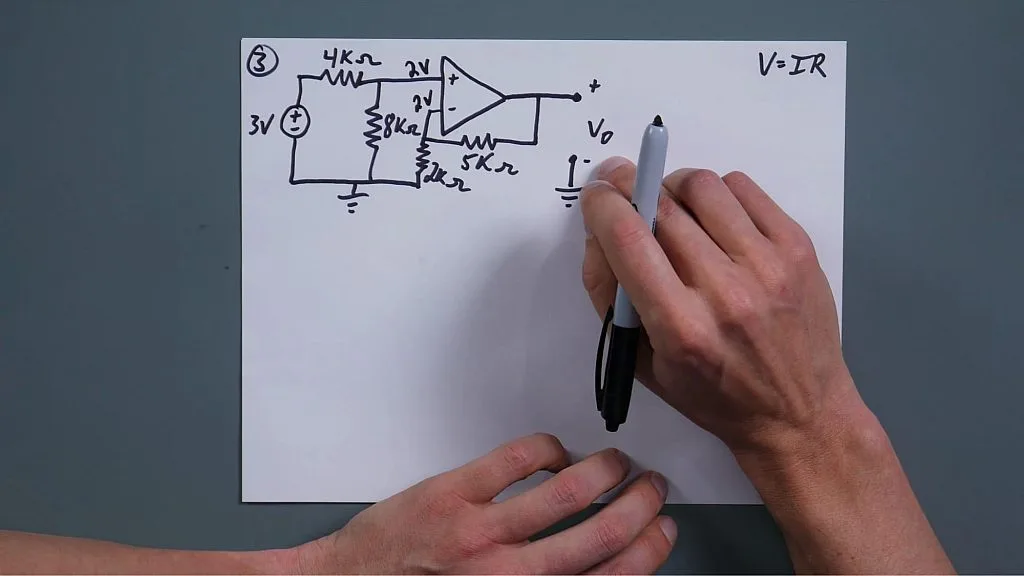
Now once we've done that we know that this spot right here is 2 volts and suddenly things become much simpler. We are still looking for our VOUT here and now we know that's 2 volts so we can calculate our current through this 2 kilo ohm resistor and then once we know the current through that resistor we know the current through this resistor because again there is no current into the op-amp. It is so simple when you're able to take your time, think about it, so much stuff simplifies when you're able to do that, when you're able to just ignore those currents going in and assume that those are the same voltages.

With that, let's do some really quick math and let's figure out what our current is through these. I'll just call that i1. There we have i1 equals 2 volts over 2000 ohms and 1 milliamp. Since we know the current there is 1 milliamp, we know it's 1 milliamp through there. Now we just have to find that voltage in comparison to i1 right there so we know our VOUT minus 2 volts because don't, don't forget that this is 2 volts, this isn't ground. It's your voltage out (VOUT) over 2 volts over 5 kilo ohms is going to be 1 milliamp. All right, so we take that 5k and we multiply it on both sides and that, those units are going to cancel out and give us VOUT minus 2V equals 5 volts. There we go and then it's just simple math. VOUT equals 7 volts. That's it, that's the right answer. It's a miracle.
00:10:27 - Summary
All right. Those were three pretty simple, even though they might have looked a little bit more complicated, they're pretty simple op amp circuits made simple because of all of those assumptions that you can make with the op-amp. Again, I hope you're not like me - for some reason op-amps, it took me a while for them to sink in for it to really become intuitive and I'm not sure why because now when looking at it and it is so straightforward. You just make those assumptions and everything kind of falls into place most of the time. I hope that this helped you at least get the get your feet wet and understanding how it can be simplified by making those assumptions and even though we used numbers for the first and the third and we just created a, an equation with the second one there are a lot of very common configurations which people have already come up with the equations to describe it. Even though this is really important to understand and to do, honestly a lot of the times when you use an op-amp, you can just say, “Oh, I would like to use it in this configuration, here's the equation, I'm just going to punch in these numbers” and that math is done for you. But if you can't, you can see, this is quite straightforward. All right, I hope that helped. I hope your understanding of op-amps has increased. I hope that you're a lot more comfortable than I was when I first started with op-amps and that you can see the value of using them in a circuit.

Authored By
Josh Bishop
Interested in embedded systems, hiking, cooking, and reading, Josh got his bachelor's degree in Electrical Engineering from Boise State University. After a few years as a CEC Officer (Seabee) in the US Navy, Josh separated and eventually started working on CircuitBread with a bunch of awesome people. Josh currently lives in southern Idaho with his wife and four kids.

Related Tutorials

Related EE FAQs

What are the basic classes of power amplifiers?

Answered by Susie Maestre

What is Common-Mode Rejection Ratio in Op-amps?
Answered by Susie Maestre

What are the Golden Rules of Op-Amps?

Answered by Herald Labial

What are some design considerations for op-amp circuits?
Answered by Susie Maestre
Explore CircuitBread
- 244 Tutorials
- 9 Textbooks
- 12 Study Guides
- 31 Tools
- 104 EE FAQs
- 295 Equations Library
- 213 Reference Materials
- 97 Glossary of Terms
Friends of CircuitBread
-

Free Semiconductor Lifecycle Webinars
-

Free Electronics Lessons & Resources + 2 Perks
-

Product Samples Upon Request


Get the latest tools and tutorials, fresh from the toaster.


