RL78 Family Development Environment | Renesas RL78 - 1
Published
Hi! Welcome back again to CircuitBread. In this second tutorial of our RL78 tutorial series, we are going to discuss the RL78 family development environment. We will learn about the different hardware and software that we can use to develop projects using RL78 microcontrollers (MCUs). But before that, let’s discuss first the connection between hardware and software in embedded systems so we will understand how embedded system programming works.

As shown in figure 1, developing or programming embedded systems involves hardware and software. In order for the target device (MCU) to operate, we need to program it using hardware and software tools. Developing embedded systems starts with coding. We need to write code which contains instructions that the microcontroller will execute and to do that, we need software tools such as an IDE, a compiler, and other tools that decrease the time spent in coding. All of these software tools are, of course, installed on a computer.

Once we are done coding, the next stage in developing embedded systems is debugging. In this process, we will try to check if there are bugs or errors in our code and try to eliminate them. To perform debugging, we need a debugger which is a hardware tool. As you can see in figure 1, the debugger is connected to the target device and to the computer where the software tools are installed. After eliminating all the bugs or errors in our code, we will proceed to the last stage in embedded systems development which is programming.
In the programming stage, we need a programmer which is also a hardware tool to write our code into the program flash memory of the MCU. Nowadays, manufacturers usually offer a tool that can do both debugging and programming functions so you don’t need to get a separate tool for programming. After uploading the code to the MCU, we’re done.
So I hope that gives you an idea of what’s really happening during embedded systems development and helps you realize why we need to check the different hardware and software tools available for an MCU family before developing projects. Now with that background, let’s check RL78 hardware.
HARDWARE
Boards & Kits
Obviously, the first thing you need is an RL78 microcontroller. You can create your own board and solder the RL78 MCU you’ve selected. But if you are just new to RL78 and you just want to test it, I would not recommend this. There are boards and kits available in Renesas official distributors that will make your life easier. You can check the RL78 boards and kits here: RL78 Family Development Environment — Boards and Kits
CPU Boards (Target Boards)
One of the easy-to-use boards that Renesas offers is their CPU or target boards. These boards make it easier for beginners to evaluate the features of an RL78 MCU. Figure 1 shows the QB-R5F104LE RL78/G14 target board. As you can see, the R5F104LEAFB has a 64-pin RL78/G14 device which is mounted at the center of the board. All of the MCU pins are connected to the 40-pin connectors on the edge of the board, CN1 and CN2.

The target board also includes input and output devices that you can use for simple testing, a 20MHz resonator for the main clock, and a 32.768KHz resonator for the subclock. By connecting an on-chip debugging emulator/flash programmer (such as E2 or E2 Lite) on its 14-pin connector CN3, you can start debugging and programming the RL78 device. But unlike creating your own board where you can select the RL78 device that you want, only RL78/L1C, RL78/G1C, and RL78/G14 devices have target boards right now. Also, you need to buy an emulator which is expensive. The E2 emulator cost $482.07, while the cheaper E2 Lite still costs $67.57.
Fast Prototyping Boards

A convenient and cheaper way of evaluating the features of RL78 is using a fast prototyping board. If you just want to test the RL78/G14, Renesas offers their RL78/G14 Fast Prototyping Board (FPB) which only costs $22.56. This FPB uses an 80-pin, 512-KB flash program memory, 48-KB RAM, 8-KB data flash memory RL78/G14 device. It has a built-in emulator circuit which is equivalent to the E2 Lite emulator so you don’t need to spend $67.57 just to write or debug programs. In this tutorial series, I will be using the RL78/G14 FPB.
Renesas also offers fast prototyping boards for RL78/G1P, RL78/G1M, RL78/G1N, RL78/G23, and RL78/I1C devices. You can check them out here: RL78-Family-Fast-Prototyping-Board
Starter & Demonstration Kits
Other easy-to-use tools that Renesas offers to evaluate RL78 microcontrollers are the starter and demonstration kits. These kits include all the development environment elements needed to evaluate an RL78 MCU. Both the starter and demonstration kit comes with a board that has a target device and some basic input and output devices (switches, potentiometers, input clocks, LEDs). The difference between the two when it comes to hardware is that the demonstration kit has more on-board devices from Renesas partners that can be interfaced with the RL78 MCU. But, it only uses on-board Renesas TK debugger for programming while the starter kit includes a separate emulator. When it comes to software, you can CubeSuite+ with RL78, 78K0R compiler or e2 studio with KPIT GNURL78 toolchain for the starter kit. For the demonstration kit, you can use e2 studio or IAR Embedded Workbench with the GCC or IAR compiler.

The starter and demonstration kits might provide you all the necessary things to evaluate an RL78 MCU, but there are some reasons that I would not recommend them. The first reason is that they are expensive. While Renesas says that they are affordable development tools, all things are comparative. The starter kit costs $228.54 while the demonstration kit costs $111.49. I will not spend that much when I just want to test a device but a business may see that as a small investment. The second reason is that they are old. The emulator that comes with the starter kit is the E1 emulator which has already been discontinued. Also, the associated IDEs and compilers are not updated and have some limitations. You might encounter compatibility issues if you are using Windows 10 or 11.
Emulators
Renesas emulators are tools that you can use for on-chip debugging using IDEs such as CS+, e2 studio, IAR Embedded Workbench (Renesas partner), or Green Hills Multi (Renesas partner). There are three emulators from Renesas that support the RL78 family: E2 emulator, E2 emulator Lite, and IECUBE emulator.

As E1 is now discontinued, Renesas replaced it with the E2 emulator with a download speed that is twice as fast. This reduces the waiting time in downloading programs. Since the E2 pin arrangement that is to be connected to the user system is compatible with the E1 emulator, you can still use E2 for user systems designed for the E1 emulator. While E1 requires an optional hot-plug-in adaptor which allows you to extend debugging functionality, E2 can support the hot-plug-in function without the adapter. Another useful feature of the E2 emulator is its Current Consumption Tuning Solution. Using the QE for Current Consumption tool, E2 can be used to measure current, stop a program when excessive current is detected, and visualize the relationship between program operations and current. These lessen the time in tuning current consumption.

While the E2 emulator is fast and offers a lot of features, it is also expensive. It costs around $482.07. If you want an emulator with features equivalent to the E1 emulator at a more affordable price, the E2 emulator Lite (or E2 Lite) is the right emulator for you. It only costs $67.57 which is almost 1/8 of the price of the E2 emulator. E2 Lite is really recommended for newbies.

Renesas also offers IECUBE for RL78 devices which is a high-performance full-spec emulator. It supports rich debugging functions such as time measurement and real-time RAM monitoring. However, I would not recommend this one as you will have a hard time purchasing it. I think most of the RL78 IECUBE emulators are now obsolete and I believe they are also very expensive.
Flash Programming Tools
Renesas Flash Programmer

For programming RL78 and other Renesas MCUs on-chip flash memory, Renesas offers a programming GUI tool, the Renesas Flash Programmer (RFP). It is now in version 3.09.01. Since E2 and E2 Lite can also be used as flash programmers, you can use them in conjunction with the RFP tool to program RL78 devices flash memory.
PG-FP6 Flash Programmer

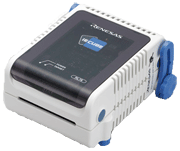
Another tool offered by Renesas for programming RL78 and other Renesas MCUs flash memory is the PG-FP6 programmer. While E2, E2 Lite, and other Renesas emulators use the RFP GUI, PG-FP6 uses its dedicated programming GUI, FP6 Terminal. The PG-FP6 is designed for high-speed and high-volume programming. You can use up to 12 PG-FP6 units to perform gang programming. In this case, you can program up to 12 MCUs simultaneously from a single PC. Another great feature of PG-FP6 is standalone operation. In standalone mode, PG-FP6 can perform Erase, Program, and Start operations without a host PC. This feature makes the PG-FP6 programmer very useful in production line programming during mass production. You can even just use a USB Powerbank to power PG-FP6 in field programming. But, the PG-FP6 is also expensive. It costs $845.85 , almost double the cost of the E2 emulator.
SOFTWARE
Integrated Development Environments (IDEs)
IDEs provide us easy-to-use graphical interface with functions or tools that help us minimize the time spent on coding, building, and debugging. While there are other IDEs offered by Renesas partners such as IAR Embedded Workbench, Renesas offers two IDEs that we can use for the RL78 devices, e2 studio and CS+.


e2 studio is an IDE based on the open source Eclipse IDE while CS+ (formerly CubeSuite+) is an IDE originally designed by Renesas. Both of these IDEs are free but the CC-RL compiler is not. There is a free evaluation edition of CC-RL but it has some limitations. If you have the money, you can purchase the CC-RL license which is really expensive and use it with CS+ or e2 studio. But if you don’t, you can use GCC which is a free and open source compiler. But you can only use GCC with e2 studio since CS+ can only use the CC-RL compiler. As the CC-RL license is really expensive, in this tutorial series, we will only use the e2 studio IDE and the GCC compiler.
e2 studio
- Simpler Development of IoT Devices Connectable with Cloud Service
The e² studio supports the development of software for IoT devices to be connectable with Amazon Web Services (AWS) or Microsoft Azure Cloud Computing Service. The e² studio offers the following powerful functions for FreeRTOS or Azure RTOS. - The e² studio IDE covers all aspects of development.
- Easily Create Projects and Code Especially for Renesas MCUs.
- Easy-to-Use Eclipse C/C++
Development Tooling (CDT) Editor - Simple Settings for Building through a GUI; Select a Compiler from Renesas or Our Partner Vendors.
- High-Spec. Debugging Functions in Combination with the Standard GNU Debugger (GDB)
- Reuse Existing Resources by Importing Projects from Other IDEs.
- High Expandability as an Eclipse-Based IDE
- Toolchains Supported by the e² studio
By registering various parts of the toolchain with the e² studio, you can use the tools you require through the e² studio interface alone. - QE: Tools for Assisting in Application Development in the e² studio
CS+
- Python Scripts
Sample scripts are available on the Web site: You do not have to write scripts from scratch. - Smart Manual
Quick reference to register information from the editor (and other panels) without having to scan through manuals - Smart Browser
View the information you require, including the contents of hardware manuals and sample code - Comparing Performance in Optimization
Easy comparison of the results of optimization for speed, not only for size, and settings for this are quick and simple. - Interoperability with the Smart Configurator
- Network Verification
[Debugging CAN bus reception procedures] No need for an actual other party when debugging communications - Online Help
Viewing the latest help files - CAN Communication Time
- Current Consumption Tuning Solution
- Verification Through Fault Injection
- Verification of Safety
- Smart Reports
Collective output of quality-related information - Main-Core Debugging
Compilers
So we keep mentioning compilers in this tutorial but have not really described the function of compilers. If you already have some experiences in embedded programming, then I think you already know what a compiler does but for those who don’t, microcontrollers can only read machine language, a program that only consists of 0s and 1s. If you are using Assembly language which is a low-level language, an assembler translates the assembly language program to machine language so that the microcontroller can read it. But if you are using high-level languages such as C, C++, etc., the compiler translates the high-level language program into machine code.
For the RL78 MCUs, there are three compilers featured by Renesas on their website, CC-RL, IAR, and LLVM/GCC. CC-RL and IAR are not free. You need to purchase their license but they offer enhanced optimizations and generate codes that increase the efficiency of RL78 MCUs. GCC, as mentioned recently, is open source and free. We will be using GCC for this tutorial series.
Other Software
Aside from IDEs and compilers, there are other development tools that Renesas offers that could help you develop RL78 projects. Here are the list of those tools:
- Web Simulator
This tool allows you to simply set up RL78 MCUs operation and calculate current consumption without the need to buy a development tool. You can check it here: RL78 Web Simulator. I have not tried this yet and I don't usually use simulators so I can’t tell what are the limitations of this one. - Device Driver
- Code Generator
This tool generates code for the RL78 peripherals based on the configuration that the user will select. This is already included in the CS+ and e2 studio IDEs. So you can use this tool after you’ve installed CS+ or e2 studio. - Serial Memory
Renesas offers serial memory that you can use with the RL78 MCUs and they have also provided drivers that you can use to easily interface these serial memories with an RL78 device.- I2C Serial EEPROM Driver
A device driver for the RL78 Family I2C Bus Serial EEPROM R1EX24xxx Series, R1EV24xxx Series, and HN58X24xxx Series. - SPI Serial EEPROM Driver
A device driver for the RL78 Family SPI Bus Serial EEPROM R1EX25xxx Series and HN58X25xxx Series. - SPI/QSPI Serial Flash Memory, QSPI Serial Phase Change Memory Driver
A device driver for the RL78 Family SPI/QSPI Bus Serial Flash Memory and QSPI Bus Serial Phase Change Memory.
- I2C Serial EEPROM Driver
- Code Generator
- Middleware
- USB Driver
The device driver for USB communication using the RL78 MCU's built-in USB interface. (For RL78/G1C and RL78/L1C only.) - FAT File System [M3S-TFAT-Tiny] for the RL78 Family
The RL78 Family open source FAT file system. - Protocol Stack
- Bluetooth® Low Energy Protocol Stack
A Bluetooth v4.2 certified protocol stack that runs with the RL78/G1D BLE MCUs. - Sub-GHz/Wi-SUN
Sub-GHz/Wi-SUN (Wireless Smart Utility Network) Protocol Stack for RL78/G1H MCU.
- Bluetooth® Low Energy Protocol Stack
- Security/Cipher — Cryptographic Library
A strong cryptographic (RSA, AES and hash function) library provided by Renesas for the RL78 Family which is useful in developing systems for which security is essential. - DSP/FFT Library
A computational FFT (Fast Fourier Transform) library for RL78 MCUs. - Sound Playback/Compression System (M3S-S2-Tiny)
M3S-S2-Tiny is a sound playback system that only requires small memory. Renesas offers this library so that you can use M3S-S2-Tiny with RL78 MCUs. - Self-Programming Library
- Code Flash Library
A free-of-charge software library to be used with user programs that have to rewrite the contents of code flash memory. Also includes an EEPROM emulation library for code flash memory. - Data Flash Library
A free-of-charge software library to be used with user programs that have to rewrite the contents of data flash memory. Also includes an EEPROM emulation library for data flash memory.
- Code Flash Library
- USB Driver
- RL78V4 V2 Real-time OS for the RL78 Family
A real-time operating system (real-time OS) that conforms to the μITRON4.0 specification, the predominant real-time OS for embedded systems. It is suited for an embedded system with real-time capability and multi-tasking functions. - RL78 Sample Codes
You can check sample codes here about RL78 peripherals configurations and interfacing RL78 with other Renesas products. - Smart Configurator (only supports RL78/G23)
Similar to Code Generator, this tool outputs device driver programs as C source and header file for RL78 peripherals. The Smart Configurator supports functions such as importing middleware in the form of Firmware Integration Technology (FIT) modules, generating driver code, and setting pins from the Code Generator Plug-in. Unfortunately, it only supports RL78/G23. - Renesas Partners Software Products
So now we are done discussing the RL78 family development environment. We are now aware of the different hardware and software that we can use to test RL78 MCUs and even develop projects. For newbies, I recommend getting the fast prototyping boards as they are cheap and I will be using the RL78/G14 Fast Prototyping Board too in this tutorial series. For the software, we will be using the e2 studio IDE and the GCC compiler as they are free too. In the next tutorial, we will show the IDE and compiler installation.

Authored By
JB Magoncia
JB is an Electronics Engineer who is interested in audio, embedded systems, and PCB design. He is one of CircuitBread Engineers. JB is also a musician who mainly plays piano/keyboard but can also play bass, guitar, and drums. He currently lives in Cagayan de Oro, Philippines.

Related Tutorials

Related EE FAQs
 work?")
How do Analog to Digital Converters (ADCs) work?

Answered by Uma Bharathi D

What's the difference between a regular relay and a power relay?

Answered by Jayesh Upadhyay

What is a PWM signal?
Answered by Jayesh Upadhyay

Why is RAM faster than other memories?
Answered by Jayesh Upadhyay
Explore CircuitBread
- 244 Tutorials
- 9 Textbooks
- 12 Study Guides
- 31 Tools
- 104 EE FAQs
- 295 Equations Library
- 213 Reference Materials
- 97 Glossary of Terms
Friends of CircuitBread
-

Free Semiconductor Lifecycle Webinars
-

Relays, Switches & Connectors Knowledge Series
-

Product Samples Upon Request


Get the latest tools and tutorials, fresh from the toaster.


