Installing IDE and Toolchains for RL78 | Renesas RL78 - 2
Published
Hi! Welcome back again to CircuitBread. In our previous tutorial, we discussed the RL78 family development environment, the hardware and software that you need in order to start evaluating the RL78 MCUs. In this tutorial, we are going to install the IDE, compiler, and other software that we are going to use in this tutorial series.
Downloading e2 studio Installer
The first thing we need to do is download the e2 studio installer. To do that, we need to visit Renesas website: https://www.renesas.com/us/en, click the Account icon or button, and then click Log In.

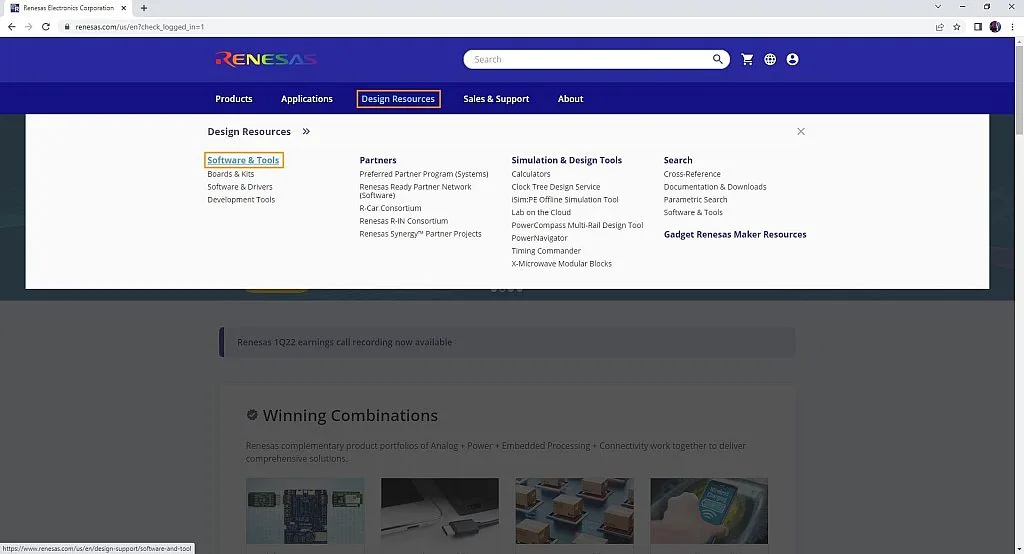
Yes, you must be logged in to download the e2 studio installer. If you don’t have an account yet, you can click the Create Account link to create an account. After logging in, you will be redirected to the home page. Then in the home page, click Design Resources. Under it, click the Software & Tools link to go to the Software and Tools page.

In the Software and Tools page, scroll down, find the e2 studio (Eclipse) link, and click it to go to the e2 studio page.


In the e2 studio page, just click the e2 studio xxxx-xx installer for Windows link to download the installer. If there’s a Document Update Notification popup or confirm box, just select No. Not at this time if you don’t want to be notified and then click the Confirm button.

A new tab will open and redirect you to the download page. Just click the Accept and download button to start downloading.

Renesas keeps on updating their website. So by the time you check this tutorial, they might have already changed their website’s layout. The important thing to remember here is that you are required to create an account in order to download the e2 studio installer.
Installing e2 studio IDE
Once the download is complete, unzip the file and then extract the e2 studio installer. After it extracts the installer, we will be asked which user accounts you want to install e2 studio. You can just select All Users if you want it to be installed on all user accounts of your computer or just select Current user if you just want it to be installed on your account.


Now, the installer will continue to prepare the prerequisite software and other software and once it’s done, you will see the e2 studio installation window. On its Welcome page, you can change the installation directory and other settings but let’s just leave it like that and click the Next button.

Next, we will be asked to select the device families that we want to be supported in e2 studio. Let’s select RL78 and click the Next button again.

Next, we will be asked if we want to install extra features. In my case, I don’t need support for other languages but I think we might use Git Integration and Terminals so I’m going to include it in the installation.

After clicking the Next button, the installation will proceed to the Customise Features page. By default, the installer will select the components required in the e2 studio installation and components related to RL78 devices. We actually don’t need to change anything here if we just want RL78 support. So let’s click Next and move to Additional Software.

Here, we will be asked to select some additional software and this is actually where we select and include the compilers in the installation. As you can see, there are three tabs. The first tab is Renesas QE where we can select QE for Capacitive Touch and QE for USB. I don’t think I need the QE for USB tool but I think QE for Capacitive Touch might be useful so I’m going to select it.

The second tab Renesas Toolchains & Utilities is where we can select a Renesas RL78 compiler and other tools. Although we won’t be using the CC-RL compiler, I’m just going to install it in case I’ll need it later. The SMS Assembler by default is selected so I’m just going to leave it as I’m still not sure if I’ll use it either.

Now let’s check the last tab GCC Toolchains & Utilities. By default, only LLVM for Renesas RL78 is selected. Based on llvm-gcc-renesas.com website, they claim that LLVM for Renesas RL78 is better both in code size and in speed compared to GCC for Renesas RL78. But I have not actually tried it yet so I’m going to use GCC for now. Let’s include GCC for Renesas RL78 and click the Next button to proceed to Licenses.

This is the part where we just click “<strong>I accept the terms of the Software Agreements</strong>” and the Next button since we don’t have a choice. We won’t be able to use the software if we don’t accept the terms. Just kidding! Please read it carefully and if everything looks good to you, accept the terms and click the Next button.

Next is Shortcuts. Well, let’s just leave it like that and click the Next button.

So in the Summary, we can see the list of software that we are about to install. Just review if everything that we have selected before are in the list. If everything looks good, then click the Install button to start the installation.


During the installation, you will be asked again if you really want to install the drivers, compilers, etc. Just agree to everything by clicking the Next button, accepting the terms, clicking the Install button and the Finish button. Also, during the installation of the GCC and LLVM compilers, you might need to create an account at llvm-gcc-renesas.com to get an activation code in case the compiler requires it.


When installation is done, the Results page will be shown where you can select to Launch e2 studio, view Release Notes and What’s New after clicking the OK button. It’s up to you if you want to immediately launch e2 studio and view the documents after clicking OK.

Now we’re done with the installation of the IDE, compilers, and other software. Let’s try to run the e2 studio IDE.

After opening e2 studio, we will be asked to select a workspace directory. Your projects will be saved in this directory. I’m okay with the default directory, so I’m going to click the Launch button now.


While e2 studio is loading, a Toolchain Integration window will appear. Here we are going to enable and register the compilers we have installed. Just make sure everything is checked here and click the Register button. In my case, GCC and LLVM didn’t ask for activation code. I think the new version of these compilers don’t ask for an activation code anymore.

After e2 studio loads everything, you’ll see e2 studio window and this My Renesas Login window. Just login using the email address and password you used when you downloaded the e2 studio installer and it’s up to you if you will allow your usage to be recorded and sent to Renesas.

It will also ask for a password hint if ever you need to recover your password but I selected No here.


Finally, everything’s done and we can now start creating a project by clicking the File menu and then select New >> Renesas C/C++ Project >> Renesas RL78. But for now we’ll stop here since we have already achieved our goal. In the next tutorial, we will create a very simple project using the RL78/G14 Fast Prototyping Board and connect a switch and an LED to the RL78 MCU. So please make sure that you’ve already got the hardware. See you next time!

Authored By
JB Magoncia
JB is an Electronics Engineer who is interested in audio, embedded systems, and PCB design. He is one of CircuitBread Engineers. JB is also a musician who mainly plays piano/keyboard but can also play bass, guitar, and drums. He currently lives in Cagayan de Oro, Philippines.

Related Tutorials

Related EE FAQs
 work?")
How do Analog to Digital Converters (ADCs) work?

Answered by Uma Bharathi D

What's the difference between a regular relay and a power relay?

Answered by Jayesh Upadhyay

What is a PWM signal?
Answered by Jayesh Upadhyay

Why is RAM faster than other memories?
Answered by Jayesh Upadhyay
Explore CircuitBread
- 244 Tutorials
- 9 Textbooks
- 12 Study Guides
- 31 Tools
- 104 EE FAQs
- 295 Equations Library
- 213 Reference Materials
- 97 Glossary of Terms
Friends of CircuitBread
-

Search Hundreds of Component Distributors + 2 Perks
-

Free YouTube Product Training Guides
-

Power Supply Related Technical Resources + 1 Perk


Get the latest tools and tutorials, fresh from the toaster.


